> ## Documentation Index
> Fetch the complete documentation index at: https://www.carstoragesoftware.com/docs/llms.txt
> Use this file to discover all available pages before exploring further.
# Use Auto-fill when building a template
> Let the app suggest signature, name, and date fields on your PDF so you spend less time dragging fields by hand.
## What you will accomplish
You will use **Auto-fill** on a contract template so the app scans your PDF and suggests where customer names, signatures, dates, and other fields should go. You review the suggestions, accept the good ones, and adjust anything that looks wrong.
This saves time when you upload a new storage agreement, waiver, or service authorization.
## When to use Auto-fill
* You just uploaded a new PDF template and need to place many fields.
* Your PDF already has form fields or clear labels the app can read.
* You want a fast starting point before fine-tuning field positions by hand.
Auto-fill is a **helper**, not a replacement for human review. Always check every field before you send contracts to real customers.
## Before you start
* You already created the template and opened the template editor. If not, start with [Create a contract template](/docs/contracts/create-a-contract-template).
* Your PDF is final and readable (not a blurry scan when you can avoid it).
* You can sign in to [Settings > Contracts & Documents](https://www.carstoragesoftware.com/dashboard/settings/contracts-and-documents).
## Step 1: Open the template editor
Open [Settings > Contracts & Documents](https://www.carstoragesoftware.com/dashboard/settings/contracts-and-documents).
Find your template (for example **Car Storage Agreement**) and click **Configure**.
**Expected result:** The template editor opens with your PDF in the center and the field list on the side.
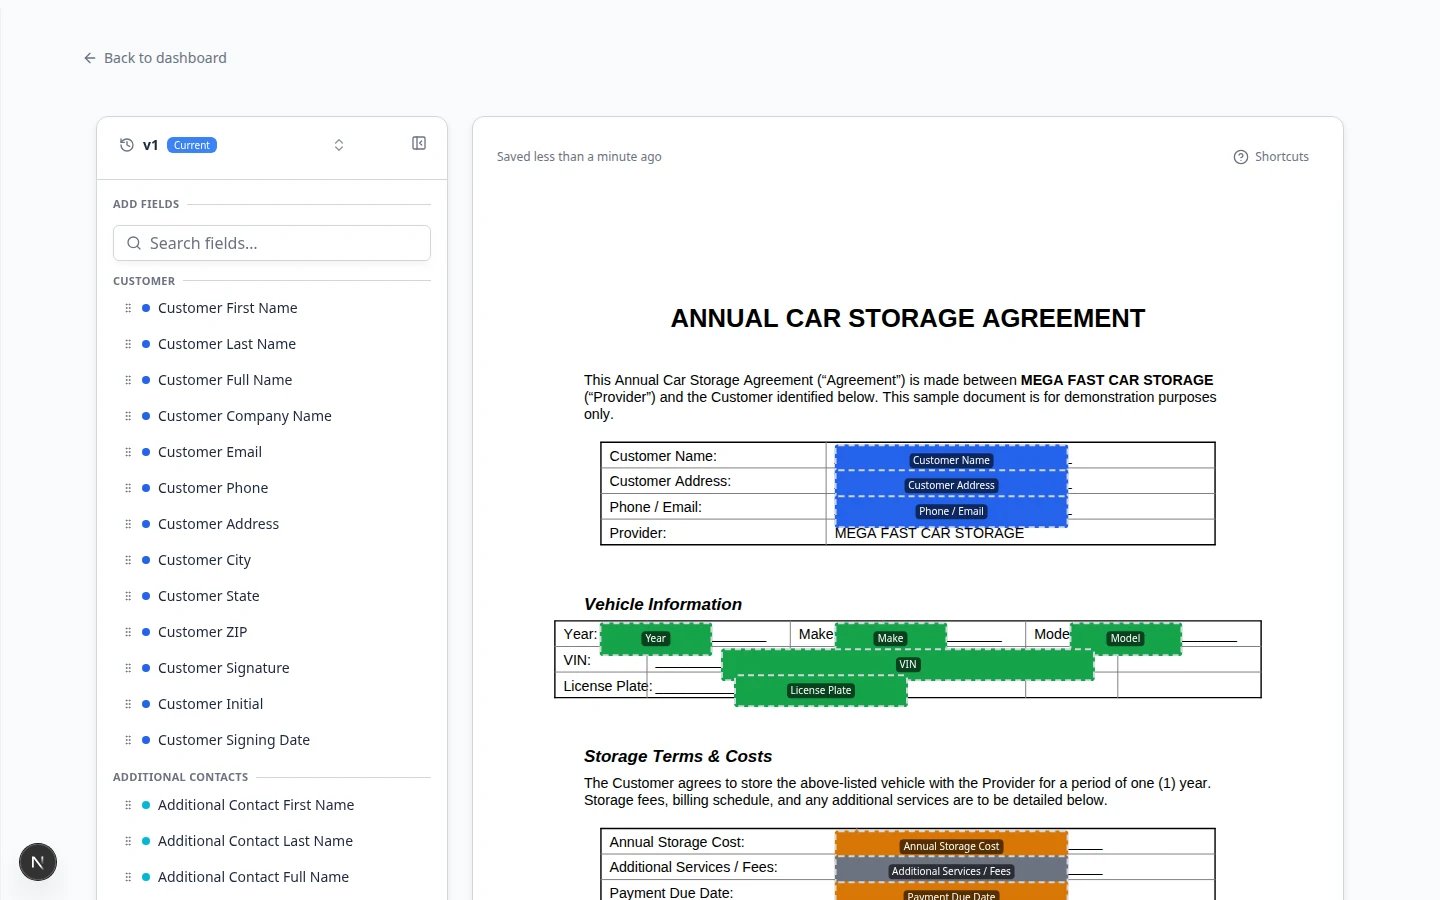 *Open the template editor from **Configure** on your template row. Suggested fields appear in the **right sidebar** after the PDF loads.*
## Step 2: Review automatic field suggestions
When you open **Configure** on a new template, the app often reads your PDF and lists suggested fields in the **right sidebar**—customer name, signature, date, vehicle details, and similar spots.
After the editor loads, look below the **Add Fields** search box in the sidebar. You may see a panel titled with the number of **suggestions** and how they were found (for example **Native PDF form fields** or **PDF text layout**).
**Why this matters:** These suggestions are a starting point. They save time compared with dragging every field by hand.
Each row shows a field label and page number. Example: **Customer Name** on page 1, **Customer Signature** near the bottom.
If you do not see suggestions yet, wait a few seconds—the app may still be reading the PDF.
*Open the template editor from **Configure** on your template row. Suggested fields appear in the **right sidebar** after the PDF loads.*
## Step 2: Review automatic field suggestions
When you open **Configure** on a new template, the app often reads your PDF and lists suggested fields in the **right sidebar**—customer name, signature, date, vehicle details, and similar spots.
After the editor loads, look below the **Add Fields** search box in the sidebar. You may see a panel titled with the number of **suggestions** and how they were found (for example **Native PDF form fields** or **PDF text layout**).
**Why this matters:** These suggestions are a starting point. They save time compared with dragging every field by hand.
Each row shows a field label and page number. Example: **Customer Name** on page 1, **Customer Signature** near the bottom.
If you do not see suggestions yet, wait a few seconds—the app may still be reading the PDF.
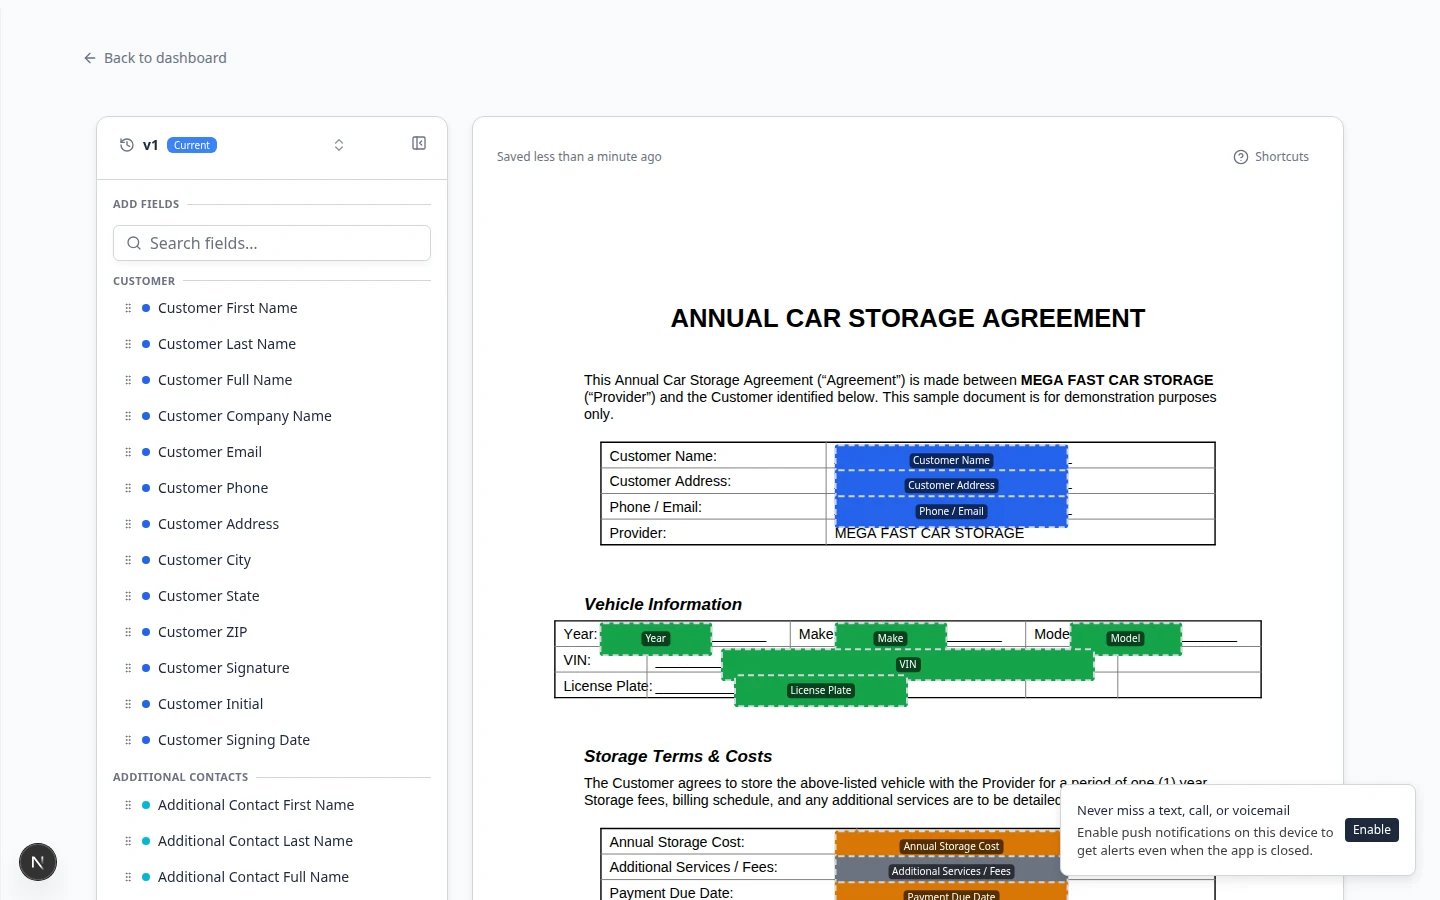 *After the editor loads, review suggested fields in the **right sidebar**. Use **Accept all** when every box looks right, or accept or reject suggestions one at a time.*
**Expected result:** You see one or more suggested fields with labels and positions on the PDF preview.
**What Auto-fill looks for**
The app may read **native PDF form fields**, **text labels** on the page, or use **AI vision** on complex layouts. The suggestion panel tells you which method was used so you know how much to double-check by hand.
## Step 3: Accept or reject suggestions
Read the label and look at the highlighted box on the PDF. Ask: **Is this where a customer or staff member should type or sign?**
**Why this matters:** A signature box on the wrong line can invalidate an agreement or confuse customers.
Click the check mark on a single suggestion, or use **Accept all** when every suggestion looks correct.
Click **Reject** on a bad suggestion, or use **Reject all** to start over with manual placement.
**Expected result:** Accepted fields appear in your field list and on the PDF. Rejected ones disappear.
## Step 4: Fine-tune by hand
Auto-fill rarely places every field perfectly.
* Drag fields to better positions on the PDF.
* Add missing fields from the side panel (initials, vehicle VIN, facility name, and so on).
* Delete duplicate or overlapping fields.
* Mark required fields so staff know what must be filled before send.
* Hold **Shift** and drag to select several fields, then mark them required or amendable together.
**Expected result:** The template matches how your facility actually uses the agreement.
## Step 5: Save and test
The editor saves as you go. Wait until any saving message finishes before you leave the page.
Near the top of the screen, look for **Saved** or **All changes saved**.
From a test customer record, follow [Send a contract for signature](/docs/contracts/send-a-contract-for-signature) and open the signing link yourself.
**Expected result:** Every field appears in the right place for both staff and customer. Pay special attention to signature boxes, initials, and vehicle lines near the bottom of the page.
Keep your original PDF open on your computer while you test. If a line of text moved in a new legal version, reject the old Auto-fill placement and drag the field by hand.
**Why this matters:** Auto-fill guesses from layout. A one-line shift in your PDF can put a signature box on the wrong line.
## Troubleshooting
**No suggestions panel?**
If the sidebar stays empty, your PDF may be a flat scan without readable text. Try a PDF exported from Word or Google Docs, or place fields manually from **Add Fields** in the sidebar. Dense legal layouts often need more hand work even when suggestions appear.
**Fields landed on the wrong lines**
Reject those suggestions and drag fields yourself. Multi-column or dense legal text often needs manual placement.
**I accepted a field but need to move it**
Click the field on the PDF or in the field list and drag it to a better spot. You do not need to run Auto-fill again.
## What to do next
When the template is ready, share [Send a contract for signature](/docs/contracts/send-a-contract-for-signature) with front desk staff.
If the agreement should also book a drop-off or other visit, add **Event Scheduling** after Auto-fill using [Schedule a service while signing a contract](/docs/contracts/schedule-a-service-while-signing-a-contract). Auto-fill does not place that field for you.
If customers must sign during portal setup, continue with [Attach contracts to customer workflows](/docs/contracts/attach-contracts-to-workflows).
This documentation is built and hosted on [Mintlify](https://mintlify.com), a developer documentation platform.
*After the editor loads, review suggested fields in the **right sidebar**. Use **Accept all** when every box looks right, or accept or reject suggestions one at a time.*
**Expected result:** You see one or more suggested fields with labels and positions on the PDF preview.
**What Auto-fill looks for**
The app may read **native PDF form fields**, **text labels** on the page, or use **AI vision** on complex layouts. The suggestion panel tells you which method was used so you know how much to double-check by hand.
## Step 3: Accept or reject suggestions
Read the label and look at the highlighted box on the PDF. Ask: **Is this where a customer or staff member should type or sign?**
**Why this matters:** A signature box on the wrong line can invalidate an agreement or confuse customers.
Click the check mark on a single suggestion, or use **Accept all** when every suggestion looks correct.
Click **Reject** on a bad suggestion, or use **Reject all** to start over with manual placement.
**Expected result:** Accepted fields appear in your field list and on the PDF. Rejected ones disappear.
## Step 4: Fine-tune by hand
Auto-fill rarely places every field perfectly.
* Drag fields to better positions on the PDF.
* Add missing fields from the side panel (initials, vehicle VIN, facility name, and so on).
* Delete duplicate or overlapping fields.
* Mark required fields so staff know what must be filled before send.
* Hold **Shift** and drag to select several fields, then mark them required or amendable together.
**Expected result:** The template matches how your facility actually uses the agreement.
## Step 5: Save and test
The editor saves as you go. Wait until any saving message finishes before you leave the page.
Near the top of the screen, look for **Saved** or **All changes saved**.
From a test customer record, follow [Send a contract for signature](/docs/contracts/send-a-contract-for-signature) and open the signing link yourself.
**Expected result:** Every field appears in the right place for both staff and customer. Pay special attention to signature boxes, initials, and vehicle lines near the bottom of the page.
Keep your original PDF open on your computer while you test. If a line of text moved in a new legal version, reject the old Auto-fill placement and drag the field by hand.
**Why this matters:** Auto-fill guesses from layout. A one-line shift in your PDF can put a signature box on the wrong line.
## Troubleshooting
**No suggestions panel?**
If the sidebar stays empty, your PDF may be a flat scan without readable text. Try a PDF exported from Word or Google Docs, or place fields manually from **Add Fields** in the sidebar. Dense legal layouts often need more hand work even when suggestions appear.
**Fields landed on the wrong lines**
Reject those suggestions and drag fields yourself. Multi-column or dense legal text often needs manual placement.
**I accepted a field but need to move it**
Click the field on the PDF or in the field list and drag it to a better spot. You do not need to run Auto-fill again.
## What to do next
When the template is ready, share [Send a contract for signature](/docs/contracts/send-a-contract-for-signature) with front desk staff.
If the agreement should also book a drop-off or other visit, add **Event Scheduling** after Auto-fill using [Schedule a service while signing a contract](/docs/contracts/schedule-a-service-while-signing-a-contract). Auto-fill does not place that field for you.
If customers must sign during portal setup, continue with [Attach contracts to customer workflows](/docs/contracts/attach-contracts-to-workflows).
This documentation is built and hosted on [Mintlify](https://mintlify.com), a developer documentation platform.