> ## Documentation Index
> Fetch the complete documentation index at: https://www.carstoragesoftware.com/docs/llms.txt
> Use this file to discover all available pages before exploring further.
# Configure walkthrough photo defaults
> Set whether damage annotation opens automatically during event photo walkthroughs for each service.
## What you will accomplish
You will choose whether staff should **automatically open the damage annotation tool** when they capture walkthrough photos during an event—for example at storage intake or condition inspections.
When this is set up well:
* Intake staff mark existing scratches or dents on a vehicle diagram without an extra menu tap.
* Managers get consistent photo documentation across shifts—not only when someone remembers the markup step.
* Services that do not need damage markup (like a quick tour) can keep annotation off while intake keeps it on.
This setting is configured **on each event type**—there is no separate team-wide default on the [Services & schedule](https://www.carstoragesoftware.com/dashboard/settings/events) page. Turn it on for the services that need it (often **Vehicle Drop Off** or **Storage Intake**) and leave it off for everything else.
**Walkthrough photos vs photo rules**
**Walkthrough photo defaults** control *how* the camera behaves during a visit (auto-open damage tool).
**Photo rules** control *which* photos are required. Set required zones in [Configure photo rules](/docs/events/configure-photo-rules).
## When to use this setting
Turn **Auto-open damage annotation** on when:
* Your facility documents existing damage at intake and wants staff to mark scratches or dents on a vehicle diagram.
* Managers want a consistent photo workflow without relying on staff to remember an extra tap.
* Disputes about pre-existing damage are common—annotated photos protect your team and the customer.
Leave it off when:
* Most of your event types only need simple zone photos (front, rear, odometer) without damage markup.
* The service is quick and staff rarely need the damage diagram (for example a customer tour or pickup reminder).
## Before you start
* You can open [Settings > Services & schedule](https://www.carstoragesoftware.com/dashboard/settings/events) as a team admin.
* You know which event types use walkthrough photos (often **Vehicle Drop Off**, **Storage Intake**, or **Inspection**).
* If staff do not see any photo prompts during events, add required zones first in [Configure photo rules](/docs/events/configure-photo-rules).
## Set auto-open for one event type
In the left sidebar, click **Settings**, then **Services & schedule**. You can also go directly to [Settings > Services & schedule](https://www.carstoragesoftware.com/dashboard/settings/events).
**Expected result:** You see a grid of service cards (for example **Vehicle Drop Off**, **Detail Appointment**, **Internal Service**) plus a dashed **Add a service** tile at the bottom.
Find the service you want to change (for example **Vehicle Drop Off**).
Click **Set up** for the guided step-by-step editor, or **Advanced** for the full settings page on one screen.
**Why this matters:** Both paths reach the same **Photo Documentation** section. Use whichever your team prefers—**Advanced** is often faster when you only need to flip one switch.
Scroll until you see the **Photo Documentation** heading.
Look for **Auto-open damage annotation** just below the zone photo list.
**Why this matters:** When this is on, the damage markup screen opens right after staff take a walkthrough photo. That one less tap can mean the difference between documented damage and a missed scratch.
Flip the switch to match how this service should behave.
**Expected result:** A short success message appears. The setting saves immediately for this event type only—other services keep their own switches.
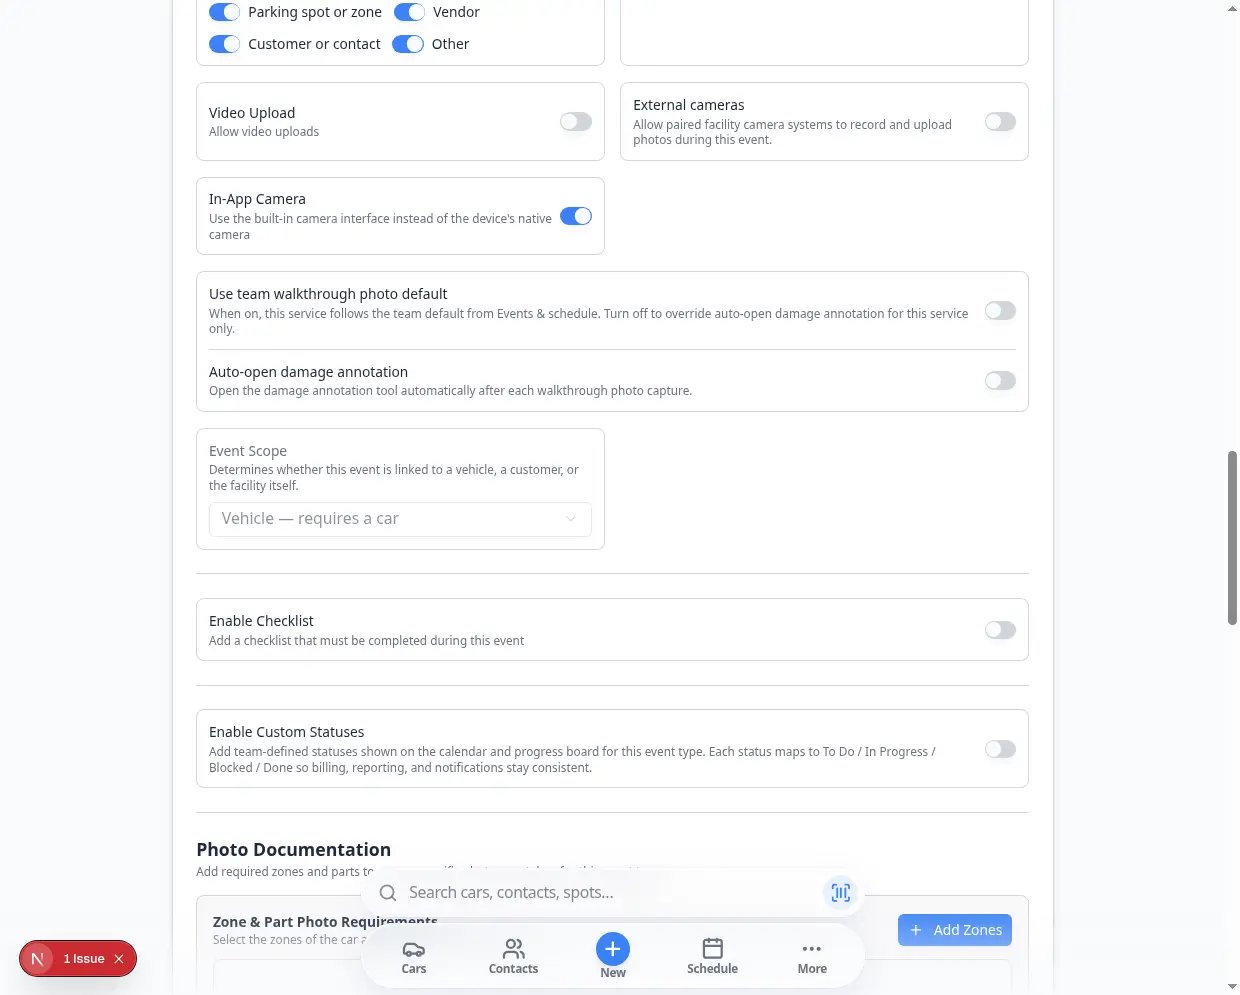 *In **Photo Documentation**, turn **Auto-open damage annotation** on for intake and inspection services. Leave it off when staff only need simple zone photos.*
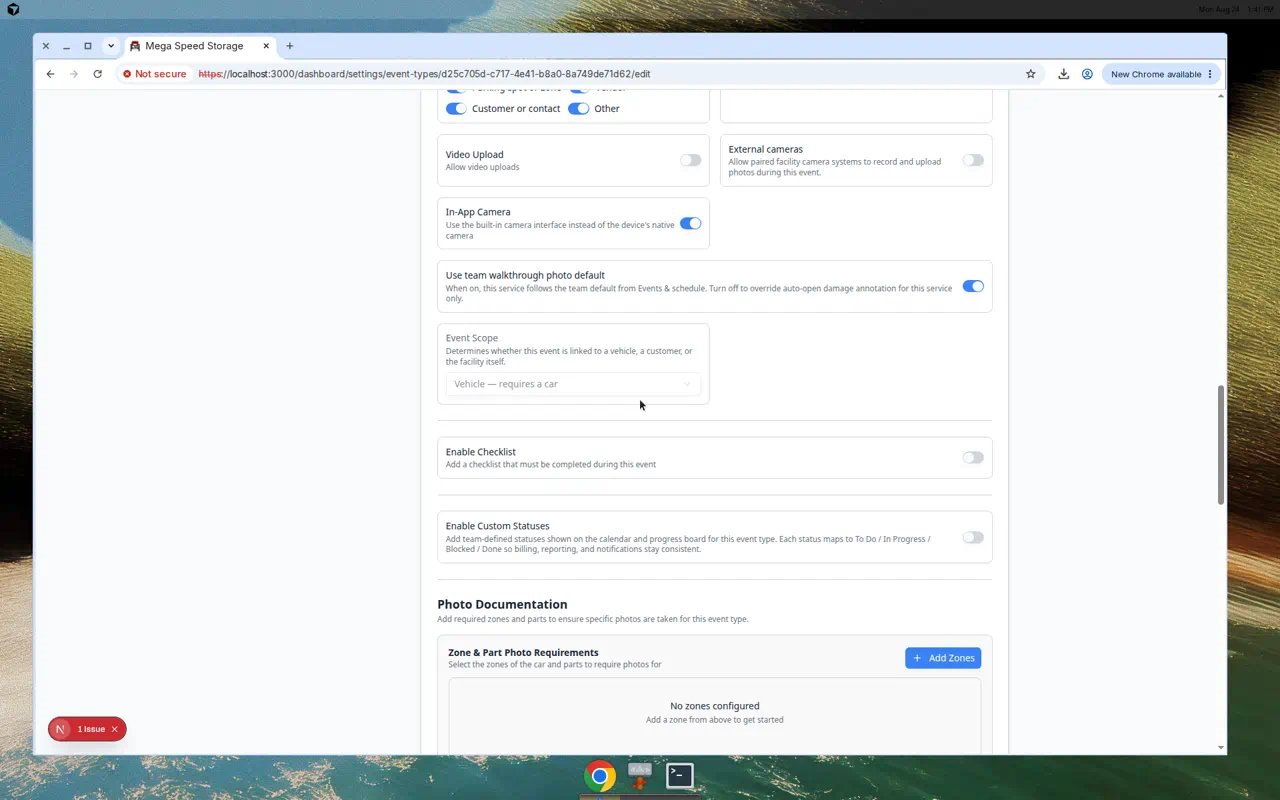 *Walkthrough defaults sit in the same **Photo Documentation** section as required photo zones. Set *which* photos are required in [Configure photo rules](/docs/events/configure-photo-rules).*
## Set up intake vs other services
Most facilities turn auto-open **on** for intake and **off** for everything else.
**Example setup for Mega Speed Storage:**
| Service | Auto-open damage annotation |
| - | - |
| Vehicle Drop Off | **On** — staff mark existing damage at intake |
| Detail Appointment | **Off** — before/after photos only |
| Vehicle Pickup | **Off** — quick departure photos |
| Customer Tour | **Off** — no damage documentation needed |
**Configure each service separately**
Open each event type that needs damage markup and turn **Auto-open damage annotation** on. You do not need to change services that only use simple zone photos.
## What staff see during an event
Understanding the on-screen flow helps you train intake and explain the setting to managers.
**With auto-open on:** Staff tap a photo zone → take the picture → the damage annotation screen opens immediately → they mark any existing damage → return to the photo list.
**With auto-open off:** Staff take the photo → stay on the photo list → they can open annotation manually if your workflow allows it.
Neither setting replaces **required** photo zones. If a zone is required, staff must still capture it before completing the event.
**Train staff on the full workflow**
After you change walkthrough settings, run [Test an event setup](/docs/events/test-an-event-setup) with a real test vehicle. Open the event from [Schedule](https://www.carstoragesoftware.com/dashboard/schedule), click **Open Event**, and take one walkthrough photo so porters see exactly when the damage tool appears—or does not appear.
## Test the behavior
Follow [Test an event setup](/docs/events/test-an-event-setup) for the event type you changed. Use a test customer or add **TEST** in the notes so your team can spot the appointment later.
On [Schedule](https://www.carstoragesoftware.com/dashboard/schedule), open the test appointment and click **Open Event**.
**Expected result:** The event workflow opens with photo zones listed (if photo rules exist for this service).
Capture one required photo.
**Expected result with auto-open on:** The damage annotation screen opens without an extra menu tap.
**Expected result with auto-open off:** Staff stay on the standard photo list unless they choose annotation manually.
If you changed only one event type, repeat the test on a second service that should still have auto-open off.
**Why this matters:** This proves your intake service behaves differently—and that other services were not accidentally changed.
## Troubleshooting
**The switch is grayed out**
You may not have admin permission for schedule settings. Ask a team admin to update the setting or review your role in [Settings > Team](https://www.carstoragesoftware.com/dashboard/settings/team).
**One service behaves differently than others**
That is expected—each event type has its own **Auto-open damage annotation** switch. Open the service card and check **Photo Documentation** in the editor.
**Staff do not see photo prompts at all**
Walkthrough defaults only change *how* photos work—not *whether* photos are required. Add zones in [Configure photo rules](/docs/events/configure-photo-rules).
**Annotation opens on every photo but we only want it on intake**
Turn **Auto-open damage annotation** off on every service except your intake event type. Open each card, find **Photo Documentation**, and flip the switch only where you need damage markup.
## What to do next
* Add required photo zones in [Configure photo rules](/docs/events/configure-photo-rules).
* Train intake staff with [Use the Create event home page](/docs/basics/use-the-create-event-home).
* Run a full test with [Test an event setup](/docs/events/test-an-event-setup).
* Return to [Events overview](/docs/events/overview).
This documentation is built and hosted on [Mintlify](https://mintlify.com), a developer documentation platform.
*Walkthrough defaults sit in the same **Photo Documentation** section as required photo zones. Set *which* photos are required in [Configure photo rules](/docs/events/configure-photo-rules).*
## Set up intake vs other services
Most facilities turn auto-open **on** for intake and **off** for everything else.
**Example setup for Mega Speed Storage:**
| Service | Auto-open damage annotation |
| - | - |
| Vehicle Drop Off | **On** — staff mark existing damage at intake |
| Detail Appointment | **Off** — before/after photos only |
| Vehicle Pickup | **Off** — quick departure photos |
| Customer Tour | **Off** — no damage documentation needed |
**Configure each service separately**
Open each event type that needs damage markup and turn **Auto-open damage annotation** on. You do not need to change services that only use simple zone photos.
## What staff see during an event
Understanding the on-screen flow helps you train intake and explain the setting to managers.
**With auto-open on:** Staff tap a photo zone → take the picture → the damage annotation screen opens immediately → they mark any existing damage → return to the photo list.
**With auto-open off:** Staff take the photo → stay on the photo list → they can open annotation manually if your workflow allows it.
Neither setting replaces **required** photo zones. If a zone is required, staff must still capture it before completing the event.
**Train staff on the full workflow**
After you change walkthrough settings, run [Test an event setup](/docs/events/test-an-event-setup) with a real test vehicle. Open the event from [Schedule](https://www.carstoragesoftware.com/dashboard/schedule), click **Open Event**, and take one walkthrough photo so porters see exactly when the damage tool appears—or does not appear.
## Test the behavior
Follow [Test an event setup](/docs/events/test-an-event-setup) for the event type you changed. Use a test customer or add **TEST** in the notes so your team can spot the appointment later.
On [Schedule](https://www.carstoragesoftware.com/dashboard/schedule), open the test appointment and click **Open Event**.
**Expected result:** The event workflow opens with photo zones listed (if photo rules exist for this service).
Capture one required photo.
**Expected result with auto-open on:** The damage annotation screen opens without an extra menu tap.
**Expected result with auto-open off:** Staff stay on the standard photo list unless they choose annotation manually.
If you changed only one event type, repeat the test on a second service that should still have auto-open off.
**Why this matters:** This proves your intake service behaves differently—and that other services were not accidentally changed.
## Troubleshooting
**The switch is grayed out**
You may not have admin permission for schedule settings. Ask a team admin to update the setting or review your role in [Settings > Team](https://www.carstoragesoftware.com/dashboard/settings/team).
**One service behaves differently than others**
That is expected—each event type has its own **Auto-open damage annotation** switch. Open the service card and check **Photo Documentation** in the editor.
**Staff do not see photo prompts at all**
Walkthrough defaults only change *how* photos work—not *whether* photos are required. Add zones in [Configure photo rules](/docs/events/configure-photo-rules).
**Annotation opens on every photo but we only want it on intake**
Turn **Auto-open damage annotation** off on every service except your intake event type. Open each card, find **Photo Documentation**, and flip the switch only where you need damage markup.
## What to do next
* Add required photo zones in [Configure photo rules](/docs/events/configure-photo-rules).
* Train intake staff with [Use the Create event home page](/docs/basics/use-the-create-event-home).
* Run a full test with [Test an event setup](/docs/events/test-an-event-setup).
* Return to [Events overview](/docs/events/overview).
This documentation is built and hosted on [Mintlify](https://mintlify.com), a developer documentation platform.