> ## Documentation Index
> Fetch the complete documentation index at: https://www.carstoragesoftware.com/docs/llms.txt
> Use this file to discover all available pages before exploring further.
# Customize the customer mobile app
> Set up what signed-in customers see on their phone—header, home sections, and bottom tabs—before you invite them to the portal.
## What you will accomplish
You will shape the **customer mobile app**—the screens customers see after they sign in at **Customer login**. You will choose what appears at the top of **Home**, which sections show on each page, and which tabs appear at the bottom.
When you finish, customers will see a portal that looks like your facility, not a generic app.
## When to use this guide
Use this guide when:
* You are preparing to invite customers to the portal for the first time
* Customers say they cannot find **Events**, **Cars**, or **Billing** on their phone
* You want the mobile home screen to highlight photos, upcoming work, or a call button
* You finished [Configure the facility landing page](/docs/facility-web-pages/configure-the-facility-landing-page) and are ready to polish the **signed-in** experience
**Public page vs customer app**
The **public facility page** is for anyone on the internet (prospects). The **customer app** is for people who already signed in. You edit both on [Settings > Website & customer app](https://www.carstoragesoftware.com/dashboard/settings/website), but they are different sections on that page.
## Before you start
* Your logo and colors look correct in [Settings > Branding](https://www.carstoragesoftware.com/dashboard/settings/branding).
* You can open [Settings > Website & customer app](https://www.carstoragesoftware.com/dashboard/settings/website).
* You know what customers should do most often (view cars, see upcoming events, pay an invoice, call your office).
* You have at least one customer record if you want to preview real data (optional but helpful).
## Step 1: Open Customer app settings
In the dashboard sidebar, open **Settings**, then **Website & customer app**.
You can also go directly to [Settings > Website & customer app](https://www.carstoragesoftware.com/dashboard/settings/website).
**Expected result:** You see **Shareable links** at the top. Scroll down to find **Customer app**.
The **Customer app** section shows a phone-sized live preview and a row of page names: **Home**, **Events**, **Cars**, **Schedule**, **Shop**, **Billing**, **Documents**, and **Settings**.
Click a name to edit that page. Start on **Home** for the greeting and bottom tabs.
**Why this matters:** Every change saves automatically. The preview shows what signed-in customers will see—not the public website.
**Each page has its own settings**
**Home** is the greeting and bottom tabs. **Shop** is prices and filter tags. **Cars** includes **Customers can add cars**.
See [Configure the customer shop](/docs/facility-web-pages/configure-the-customer-shop) and [Let customers add their own cars](/docs/facility-web-pages/let-customers-add-their-own-cars) when you leave the home screen.
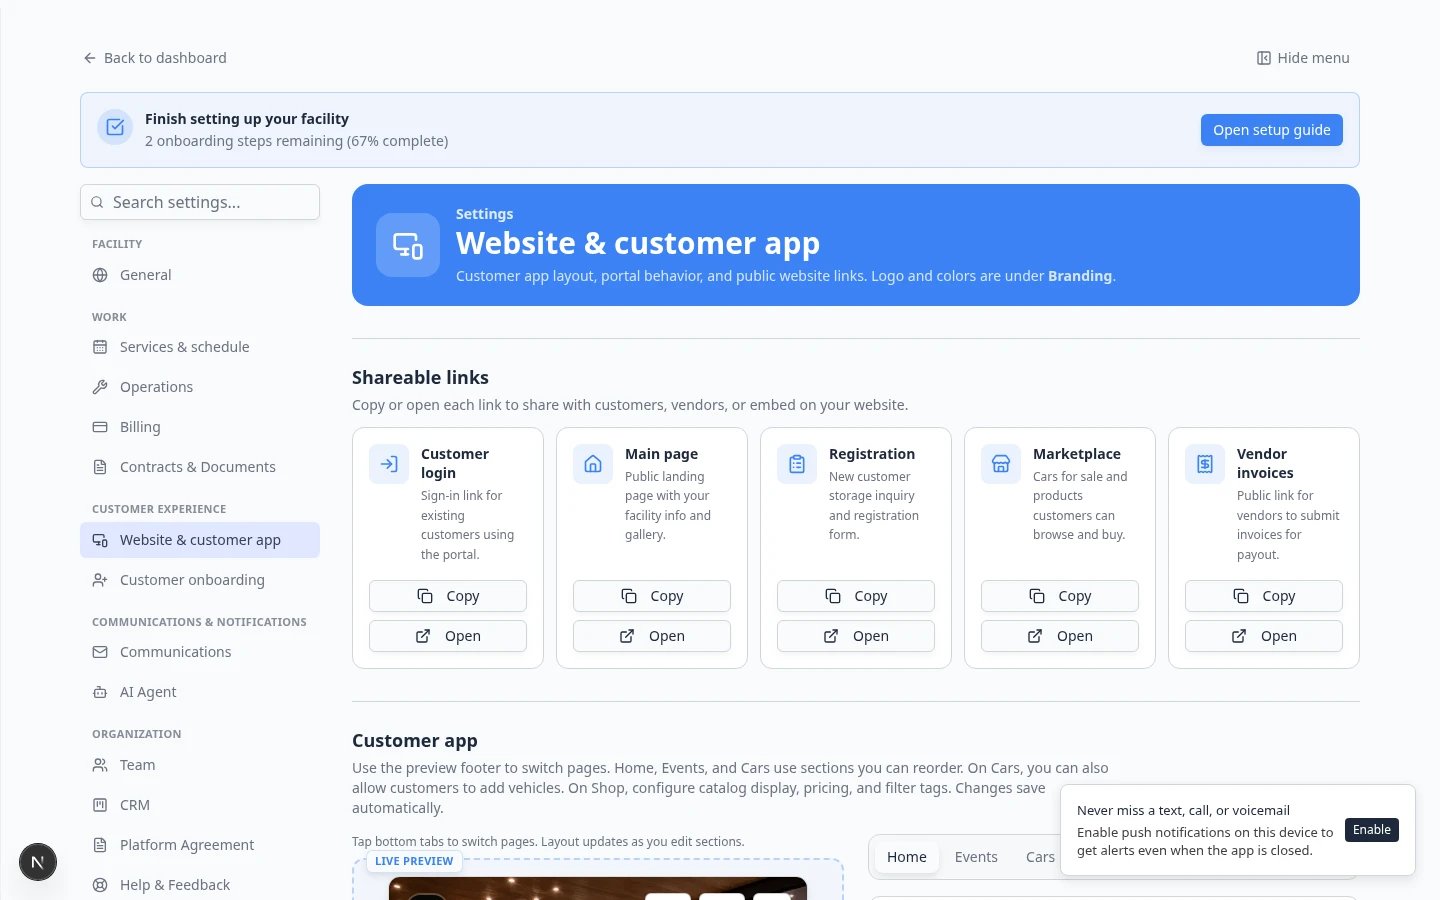 *The Customer app section includes a live phone preview. Scroll here after Shareable links when you customize the signed-in experience.*
## Step 2: Set up the header
The **header** is the top of the customer home screen—usually your facility name, a short greeting, and quick action buttons.
In the **Customer app** section, expand **Header** (or click the header area in the preview).
**Expected result:** You see fields for title, subtitle, logo toggle, and header action buttons.
Use plain language customers understand.
Good title example: **Welcome back, {firstName}**
Good subtitle example: **Your vehicles and upcoming events**
**Why `{firstName}` helps:** The app fills in the customer's first name when they sign in. It feels personal without extra work for your team.
Leave **Show logo** on if you want your facility mark next to the greeting. Turn it off if the banner image below already shows your brand clearly.
Header actions are shortcuts—common choices include **Call us**, **View events**, or **Contact**.
Keep one or two actions. Too many buttons confuse customers on a small screen.
*The Customer app section includes a live phone preview. Scroll here after Shareable links when you customize the signed-in experience.*
## Step 2: Set up the header
The **header** is the top of the customer home screen—usually your facility name, a short greeting, and quick action buttons.
In the **Customer app** section, expand **Header** (or click the header area in the preview).
**Expected result:** You see fields for title, subtitle, logo toggle, and header action buttons.
Use plain language customers understand.
Good title example: **Welcome back, {firstName}**
Good subtitle example: **Your vehicles and upcoming events**
**Why `{firstName}` helps:** The app fills in the customer's first name when they sign in. It feels personal without extra work for your team.
Leave **Show logo** on if you want your facility mark next to the greeting. Turn it off if the banner image below already shows your brand clearly.
Header actions are shortcuts—common choices include **Call us**, **View events**, or **Contact**.
Keep one or two actions. Too many buttons confuse customers on a small screen.
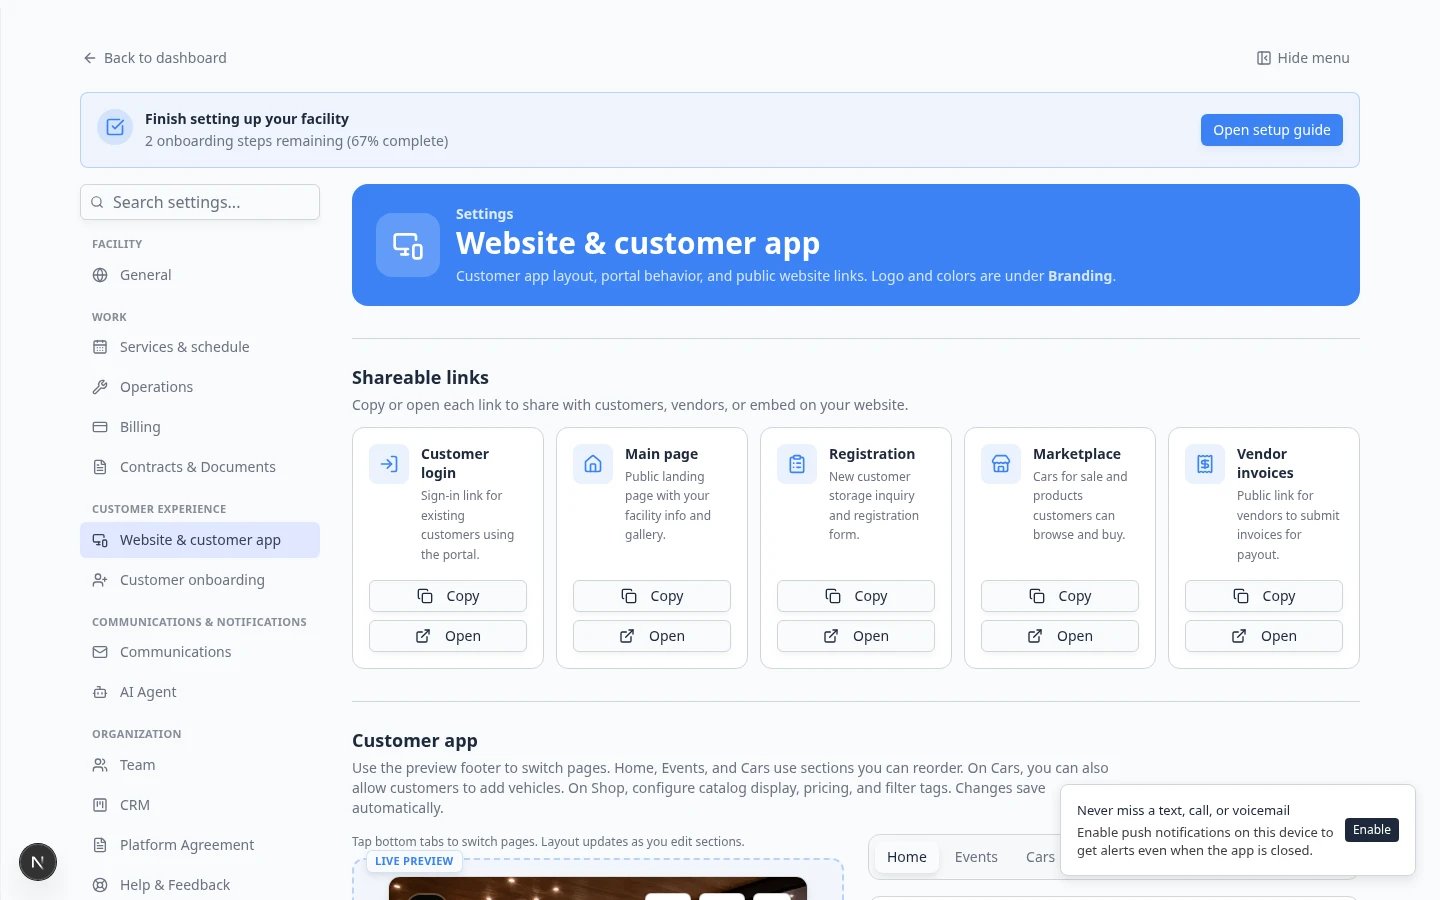 *Use the Header section to set the greeting and optional quick-action buttons at the top of the customer home screen.*
### Expected result
The live preview shows your facility name, greeting, and any header buttons you added.
## Step 3: Choose home screen sections
**Home sections** are the blocks below the header—photo gallery, upcoming events, cars, billing shortcuts, and similar items.
Expand **Home sections** (sometimes labeled **Widgets** in the preview).
**Expected result:** You see a list of sections with switches and drag handles.
Common sections include:
* **Photo gallery** — facility or vehicle photos
* **Upcoming events** — drop-offs, pickups, service appointments
* **My cars** — vehicles linked to the customer
* **Billing** or payment shortcuts — when customers pay online
Turn off sections you are not ready to support. An empty section frustrates customers.
Put the most important section first. Many facilities use: **Upcoming events** → **My cars** → **Photo gallery**.
**Why order matters:** Customers on phones rarely scroll far. Put what they need first.
Click a section to change its **Title** or **Subtitle**. Use words your customers already use ("Your cars" instead of "Vehicle inventory").
*Use the Header section to set the greeting and optional quick-action buttons at the top of the customer home screen.*
### Expected result
The live preview shows your facility name, greeting, and any header buttons you added.
## Step 3: Choose home screen sections
**Home sections** are the blocks below the header—photo gallery, upcoming events, cars, billing shortcuts, and similar items.
Expand **Home sections** (sometimes labeled **Widgets** in the preview).
**Expected result:** You see a list of sections with switches and drag handles.
Common sections include:
* **Photo gallery** — facility or vehicle photos
* **Upcoming events** — drop-offs, pickups, service appointments
* **My cars** — vehicles linked to the customer
* **Billing** or payment shortcuts — when customers pay online
Turn off sections you are not ready to support. An empty section frustrates customers.
Put the most important section first. Many facilities use: **Upcoming events** → **My cars** → **Photo gallery**.
**Why order matters:** Customers on phones rarely scroll far. Put what they need first.
Click a section to change its **Title** or **Subtitle**. Use words your customers already use ("Your cars" instead of "Vehicle inventory").
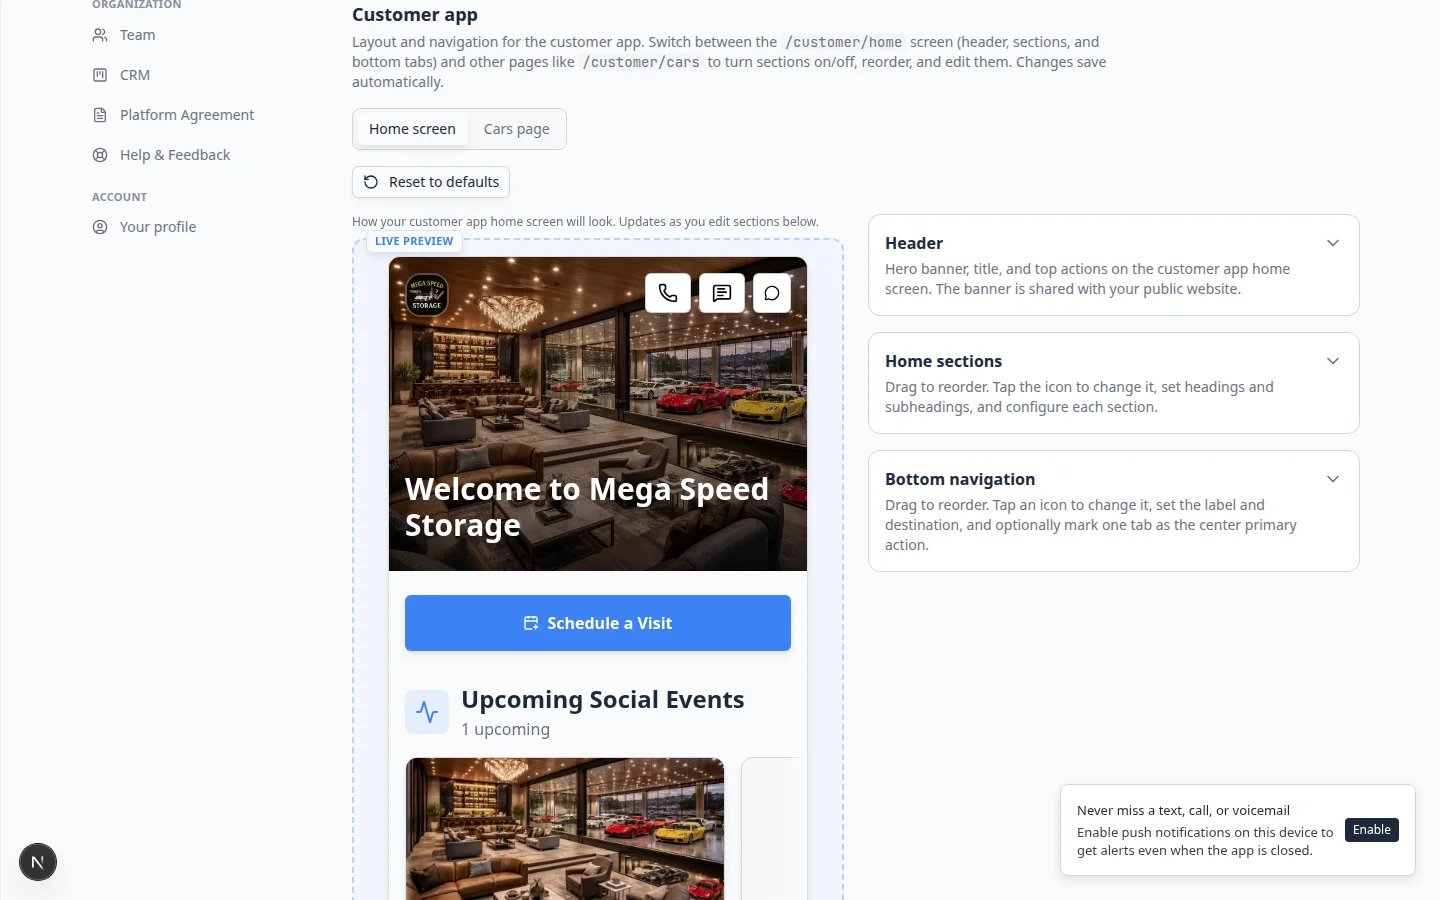 *Turn sections on or off and drag to reorder. The phone preview updates as you edit.*
**Match sections to what your facility offers**
If you do not use online billing yet, turn off billing sections until [Connect payment processing](/docs/settings/connect-payment-processing) is ready. Customers trust the portal more when every visible button works.
## Step 4: Set bottom navigation
**Bottom navigation** is the row of icons along the bottom of the phone screen—like **Home**, **Events**, **Cars**, **Billing**, and **More**.
Expand **Bottom navigation** in the Customer app section.
**Expected result:** You see each tab with a label, icon, and link target.
Most customers use thumbs on a phone. Four or five tabs is easier than seven.
A simple set: **Home** · **Events** · **Cars** · **Shop** · **Billing**
Click **Remove** on tabs that would open empty pages. You can add them back later when that feature is ready.
Each tab should open a useful page inside the customer portal. If a tab goes nowhere, customers will think the app is broken.
*Turn sections on or off and drag to reorder. The phone preview updates as you edit.*
**Match sections to what your facility offers**
If you do not use online billing yet, turn off billing sections until [Connect payment processing](/docs/settings/connect-payment-processing) is ready. Customers trust the portal more when every visible button works.
## Step 4: Set bottom navigation
**Bottom navigation** is the row of icons along the bottom of the phone screen—like **Home**, **Events**, **Cars**, **Billing**, and **More**.
Expand **Bottom navigation** in the Customer app section.
**Expected result:** You see each tab with a label, icon, and link target.
Most customers use thumbs on a phone. Four or five tabs is easier than seven.
A simple set: **Home** · **Events** · **Cars** · **Shop** · **Billing**
Click **Remove** on tabs that would open empty pages. You can add them back later when that feature is ready.
Each tab should open a useful page inside the customer portal. If a tab goes nowhere, customers will think the app is broken.
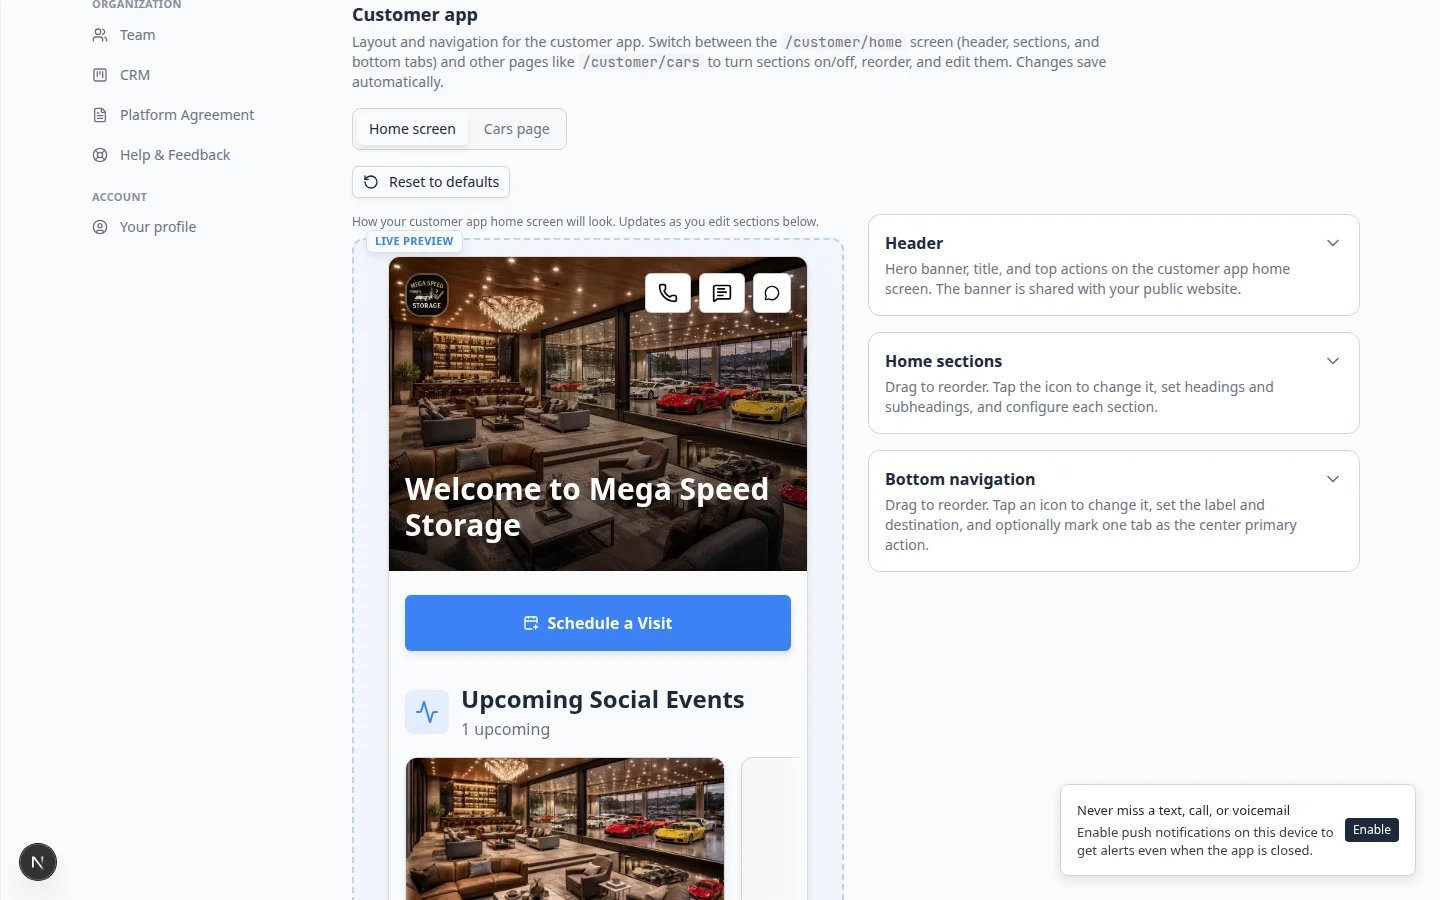 ***Bottom navigation** should match how customers think about your service—Home, Events, Cars, and Billing are common choices.*
## Step 5: Preview like a customer
Scroll to the top of [Settings > Website & customer app](https://www.carstoragesoftware.com/dashboard/settings/website). In **Shareable links**, click **Copy** on **Customer login**.
See [Share customer login links](/docs/facility-web-pages/share-customer-login-links) if you need help.
Use private or incognito mode—or a phone where you are not signed in as staff.
Paste the login link. Enter an email from a test customer in [Contacts](https://www.carstoragesoftware.com/dashboard/contacts).
**Expected result:** After sign-in, the home screen matches the layout you configured—header, sections, and bottom tabs.
***Bottom navigation** should match how customers think about your service—Home, Events, Cars, and Billing are common choices.*
## Step 5: Preview like a customer
Scroll to the top of [Settings > Website & customer app](https://www.carstoragesoftware.com/dashboard/settings/website). In **Shareable links**, click **Copy** on **Customer login**.
See [Share customer login links](/docs/facility-web-pages/share-customer-login-links) if you need help.
Use private or incognito mode—or a phone where you are not signed in as staff.
Paste the login link. Enter an email from a test customer in [Contacts](https://www.carstoragesoftware.com/dashboard/contacts).
**Expected result:** After sign-in, the home screen matches the layout you configured—header, sections, and bottom tabs.
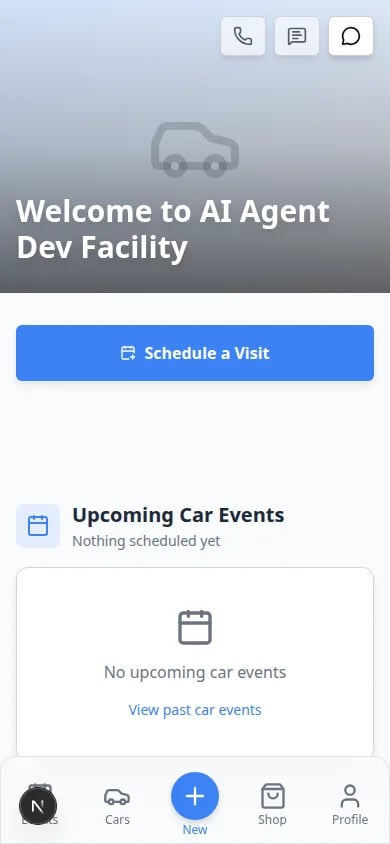 *Compare the settings preview with a real customer sign-in on a phone. The home screen should match the layout you configured—header, sections, and bottom navigation.*
## What success looks like
* The customer home screen shows your facility name and a clear greeting.
* Every visible home section has real content (or is turned off).
* Bottom tabs open the pages customers need most.
* You tested the layout on a phone or narrow browser window.
* Your team waited to send [Customer login](/docs/facility-web-pages/share-customer-login-links) links until this layout looked ready.
## Troubleshooting
**The preview looks empty**
The preview may show placeholders until your facility has photos, events, or cars. Sign in as a test customer who has linked cars and upcoming events, or add sample data before judging the layout.
**Customers do not see my changes**
Changes save automatically, but customers may need to refresh the page or sign out and back in. Confirm you edited **Customer app**, not only **Public website**.
**A section shows but has no data**
Turn that section off until your team links cars, schedules events, or turns on billing. An empty section looks like something is broken.
**Header buttons do not work**
Check each header action's link target. **Call us** needs a valid phone number from your facility settings. **Contact** should open your inbox or contact flow if enabled.
## What to do next
* [Sign up for the Apple Developer Program](/docs/facility-web-pages/sign-up-for-the-apple-developer-program) and [Set up Apple Developer for your customer App Store app](/docs/facility-web-pages/set-up-apple-developer-for-the-customer-app) if you want a **Download on the App Store** listing under your company name
* [Configure the customer shop](/docs/facility-web-pages/configure-the-customer-shop) for **Shop** prices and filter tags
* [Let customers add their own cars](/docs/facility-web-pages/let-customers-add-their-own-cars) if owners should add vehicles from **Cars**
* [Share customer login links](/docs/facility-web-pages/share-customer-login-links) when the layout is ready
* [Guide a customer through the portal](/docs/contacts/guide-a-customer-through-the-portal) so your team knows how to help on the phone
* [Go live checklist for public pages](/docs/facility-web-pages/go-live-checklist-for-public-pages) before a wide launch
This documentation is built and hosted on [Mintlify](https://mintlify.com), a developer documentation platform.
*Compare the settings preview with a real customer sign-in on a phone. The home screen should match the layout you configured—header, sections, and bottom navigation.*
## What success looks like
* The customer home screen shows your facility name and a clear greeting.
* Every visible home section has real content (or is turned off).
* Bottom tabs open the pages customers need most.
* You tested the layout on a phone or narrow browser window.
* Your team waited to send [Customer login](/docs/facility-web-pages/share-customer-login-links) links until this layout looked ready.
## Troubleshooting
**The preview looks empty**
The preview may show placeholders until your facility has photos, events, or cars. Sign in as a test customer who has linked cars and upcoming events, or add sample data before judging the layout.
**Customers do not see my changes**
Changes save automatically, but customers may need to refresh the page or sign out and back in. Confirm you edited **Customer app**, not only **Public website**.
**A section shows but has no data**
Turn that section off until your team links cars, schedules events, or turns on billing. An empty section looks like something is broken.
**Header buttons do not work**
Check each header action's link target. **Call us** needs a valid phone number from your facility settings. **Contact** should open your inbox or contact flow if enabled.
## What to do next
* [Sign up for the Apple Developer Program](/docs/facility-web-pages/sign-up-for-the-apple-developer-program) and [Set up Apple Developer for your customer App Store app](/docs/facility-web-pages/set-up-apple-developer-for-the-customer-app) if you want a **Download on the App Store** listing under your company name
* [Configure the customer shop](/docs/facility-web-pages/configure-the-customer-shop) for **Shop** prices and filter tags
* [Let customers add their own cars](/docs/facility-web-pages/let-customers-add-their-own-cars) if owners should add vehicles from **Cars**
* [Share customer login links](/docs/facility-web-pages/share-customer-login-links) when the layout is ready
* [Guide a customer through the portal](/docs/contacts/guide-a-customer-through-the-portal) so your team knows how to help on the phone
* [Go live checklist for public pages](/docs/facility-web-pages/go-live-checklist-for-public-pages) before a wide launch
This documentation is built and hosted on [Mintlify](https://mintlify.com), a developer documentation platform.