> ## Documentation Index
> Fetch the complete documentation index at: https://www.carstoragesoftware.com/docs/llms.txt
> Use this file to discover all available pages before exploring further.
# Assign team members and vendors to events
> Choose who is responsible for scheduled work—your staff, outside vendors, or both—when you create or edit an event.
## What you will accomplish
You will use the **Assigned to** control on [Schedule](https://www.carstoragesoftware.com/dashboard/schedule) to connect each event to the right people:
* **Team members** on your staff (detailers, porters, service managers).
* **Vendors** you work with (outside detail shops, transport companies, mechanics).
**Expected outcome:** The event shows clear ownership on the calendar, in **Table** view, on the **Progress** board, and when someone uses **Assigned to me**. Vendors appear with a building icon so your team knows the work may happen off-site.
## When to assign someone
* You already know which staff member will run the visit.
* An outside partner will pick up, service, or deliver the vehicle.
* A manager wants each technician to filter [Schedule](https://www.carstoragesoftware.com/dashboard/schedule) to **Assigned to me** at the start of the day.
* Handoffs matter—notes explain *what* to do; assignment explains *who* owns it.
* The visit is **All day** (no clock time). Someone still needs to own it, or **Assigned to me** will hide it.
## Before you start
* Team members already exist in [Settings > Team](https://www.carstoragesoftware.com/dashboard/settings/team).
* Vendors already exist in [Contacts > Vendors](https://www.carstoragesoftware.com/dashboard/contacts/vendors) when you plan to assign outside partners. See [Manage vendors](/docs/payments/manage-vendors).
* You can open [Schedule](https://www.carstoragesoftware.com/dashboard/schedule) and click **Schedule Event**, or open an existing event and click **Edit Event**.
**Vendors must be set up first**
The assignee list only shows vendors your facility has already added. If you do not see a transport or detail company, create the vendor record first under [Contacts > Vendors](https://www.carstoragesoftware.com/dashboard/contacts/vendors), then return to Schedule.
## Assign when you create a new event
On [Schedule](https://www.carstoragesoftware.com/dashboard/schedule), click **Schedule Event**.
**Expected result:** The **Create New Event** window opens.
Choose the **Event type**, vehicle or customer, date, and time the same way you normally would. See [Create an appointment](/docs/schedule/create-an-appointment) if you need the full walkthrough.
Find **Assigned to** on the left side of the form. It may show **Unassigned** when no one is selected yet.
Click the **Assigned to** button.
**Expected result:** A searchable list opens with **Team members** and **Vendors** sections.
Click one or more names to place a check mark next to them.
* **Team members** show a person icon.
* **Vendors** show a building icon and usually the company name (for example **Elite Detail Partners**).
You can select more than one person when two partners share the work.
**Why this matters:** Assigned names travel with the event everywhere your team looks—calendar blocks, **Table** rows, and **Progress** cards.
Finish the rest of the form and click **Create Event**.
**Expected result:** The event block shows the assignee summary. Team members can turn on **Assigned to me** to see only their work.
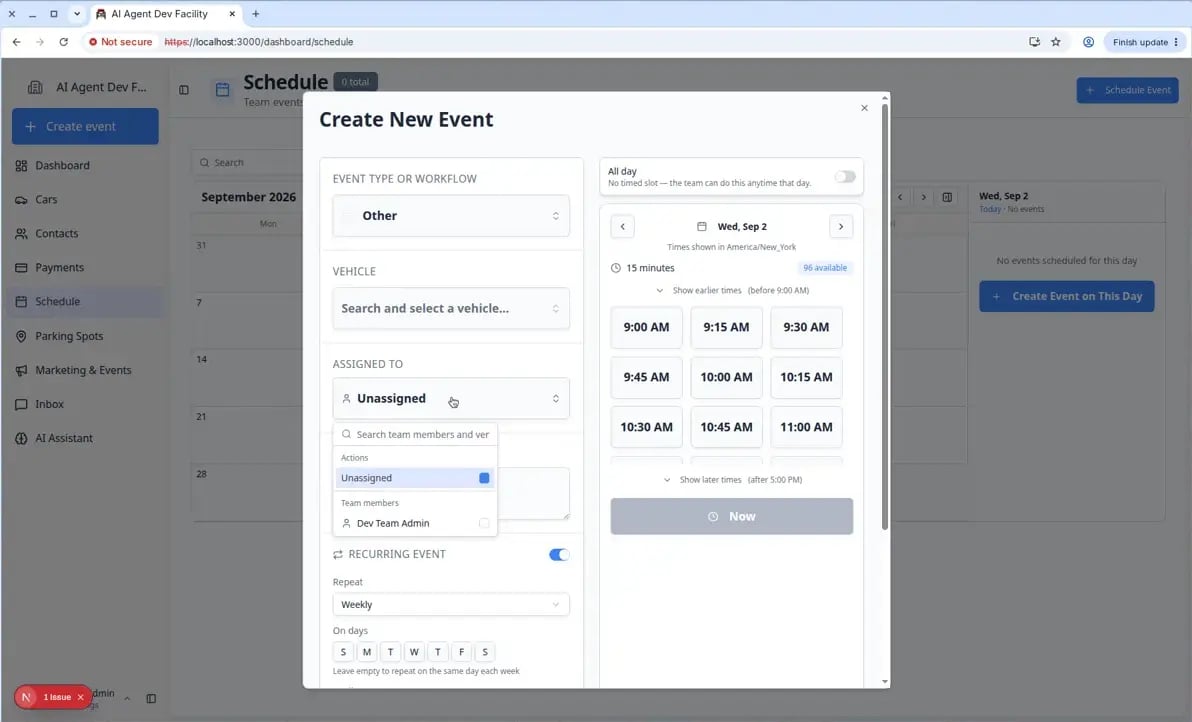 *The **Assigned to** picker lists your staff and vendors in one place. Search at the top when the list is long.*
## Change assignment on an existing event
Find the event on [Schedule](https://www.carstoragesoftware.com/dashboard/schedule) and click it.
**Expected result:** The event detail panel opens on the right (or as a sheet on smaller screens).
Near the top of the panel, look for assignee names or **Unassigned**.
**Expected result:** You see staff names, vendor company names, or a building icon for outside partners.
Click **Edit Event** in the panel.
Open the **Assigned to** control, add or remove team members and vendors, then save.
**Expected result:** The calendar and **Progress** board show the new owners immediately.
*The **Assigned to** picker lists your staff and vendors in one place. Search at the top when the list is long.*
## Change assignment on an existing event
Find the event on [Schedule](https://www.carstoragesoftware.com/dashboard/schedule) and click it.
**Expected result:** The event detail panel opens on the right (or as a sheet on smaller screens).
Near the top of the panel, look for assignee names or **Unassigned**.
**Expected result:** You see staff names, vendor company names, or a building icon for outside partners.
Click **Edit Event** in the panel.
Open the **Assigned to** control, add or remove team members and vendors, then save.
**Expected result:** The calendar and **Progress** board show the new owners immediately.
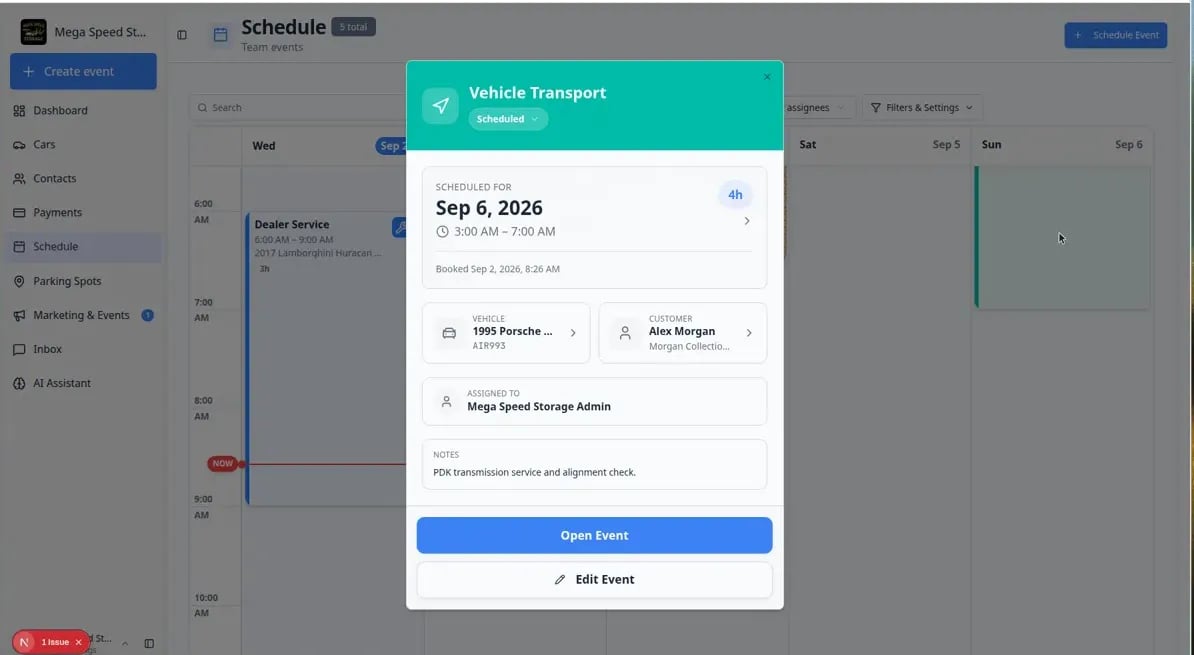 *After you save, the detail panel shows who owns the job. Transport and off-site work often list a **vendor** with a building icon.*
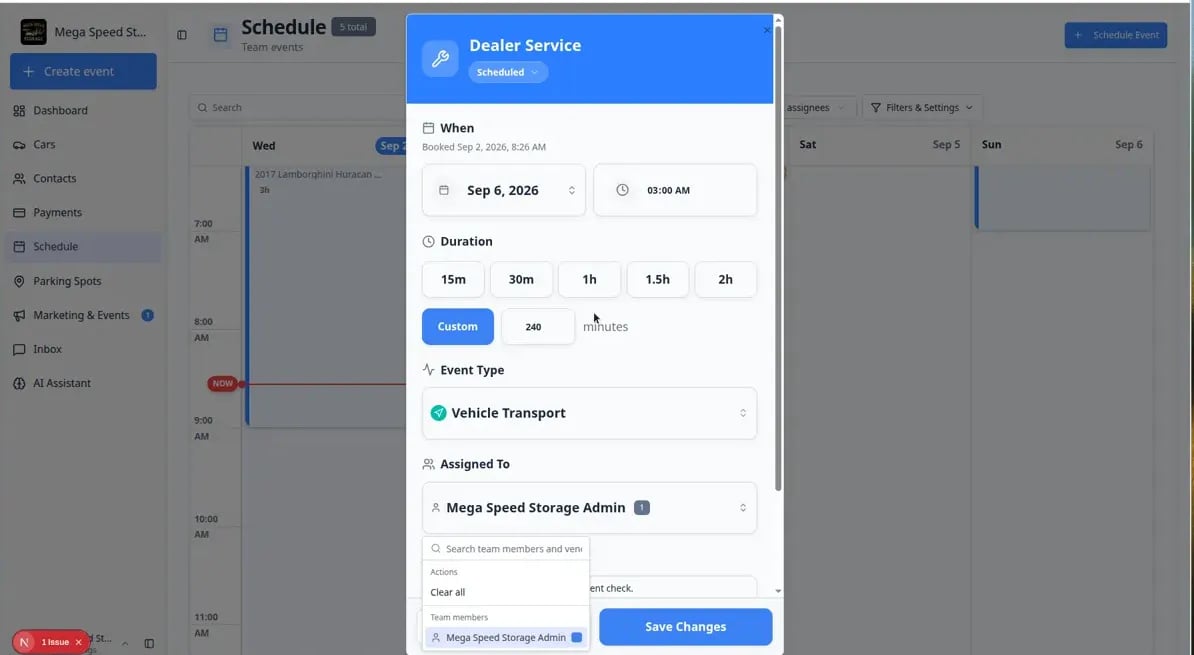 *In **Edit Event**, open **Assigned to** again to add staff, swap vendors, or clear the field if plans changed.*
For time or date changes without opening the full form, see [Update, assign, or reschedule an event](/docs/schedule/update-assign-or-reschedule-an-event).
## Filter to your own work (Assigned to me)
Technicians and porters often start the day by hiding everyone else's events.
Go to [Schedule](https://www.carstoragesoftware.com/dashboard/schedule).
Near the top of the page, click **Assigned to me**.
**Expected result:** The calendar, table, or progress view shows only events assigned to **your** staff account.
Click **Assigned to me** again (or choose **All** / clear the filter) to see every visit.
**Why this matters:** Managers usually keep the full calendar visible; individual techs use **Assigned to me** as a personal to-do list.
*In **Edit Event**, open **Assigned to** again to add staff, swap vendors, or clear the field if plans changed.*
For time or date changes without opening the full form, see [Update, assign, or reschedule an event](/docs/schedule/update-assign-or-reschedule-an-event).
## Filter to your own work (Assigned to me)
Technicians and porters often start the day by hiding everyone else's events.
Go to [Schedule](https://www.carstoragesoftware.com/dashboard/schedule).
Near the top of the page, click **Assigned to me**.
**Expected result:** The calendar, table, or progress view shows only events assigned to **your** staff account.
Click **Assigned to me** again (or choose **All** / clear the filter) to see every visit.
**Why this matters:** Managers usually keep the full calendar visible; individual techs use **Assigned to me** as a personal to-do list.
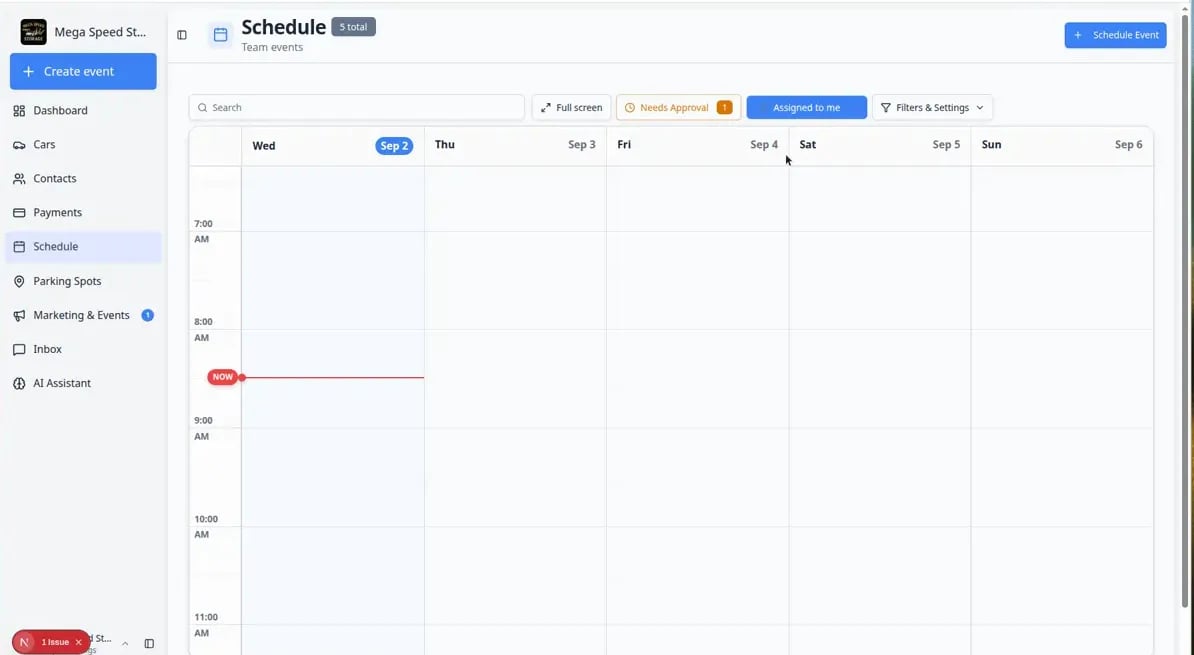 ***Assigned to me** is a quick personal filter. It does not include vendor-only events—those stay on the full team calendar.*
## How assignments look on the calendar
**One staff member** — the event may show their name on the block or card.
**One vendor** — look for the building icon or company name in the assignee summary.
**Several people** — the summary may shorten to two names plus a count (for example **Alex +1**).
**Unassigned** — the event is still on the calendar, but no one is responsible yet. Managers often filter these during morning planning.
## Assign vendors for transport and off-site work
Transport runs and outside detail visits are common reasons to pick a **vendor** instead of (or in addition to) a staff member.
* Choose an event type such as **Vehicle Transport** or **Dealer Service** when the work happens off-site.
* Assign the transport or detail **vendor** in **Assigned to** so dispatch knows who is responsible.
* When the **vehicle** physically leaves your building, also update parking on the car record—see [Send a car to an outside vendor](/docs/parking-spots/send-a-car-to-an-outside-vendor).
## Common mistakes to avoid
**Do not confuse vendor assignment with moving a car off-site**
Assigning a **vendor** on an event tells your team who owns the *scheduled work*. To record that the *vehicle* is at a vendor location on your parking map, use [Move a car](/docs/cars/move-a-car) on the car record.
**Check permissions if the field is grayed out**
Some roles cannot change assignments. Ask an admin to update the event or review permissions in [Settings > Team](https://www.carstoragesoftware.com/dashboard/settings/team).
**Vendor not in the list?**
Add the company under [Contacts > Vendors](https://www.carstoragesoftware.com/dashboard/contacts/vendors) first. The **Assigned to** picker only shows active vendor records your facility has already created.
## Troubleshooting
**I do not see the Vendors section**
Your facility may not have any active vendors yet. Open [Contacts > Vendors](https://www.carstoragesoftware.com/dashboard/contacts/vendors), add the partner, then return to Schedule.
**Assigned to me shows nothing**
The filter only shows events assigned to **your** user account—not vendors. Vendor-only events stay visible on the full team calendar.
**All-day work still needs an owner**
Turning on **All day** only hides the clock time. It does not assign the job. Set **Assigned to** so the next person can find the visit with **Assigned to me**. See [Create an all-day event](/docs/schedule/create-an-all-day-event).
## What to do next
* Create the event: [Create an appointment](/docs/schedule/create-an-appointment)
* Schedule work with no clock time: [Create an all-day event](/docs/schedule/create-an-all-day-event)
* Change time or notes later: [Update, assign, or reschedule an event](/docs/schedule/update-assign-or-reschedule-an-event)
* Add vendor records: [Manage vendors](/docs/payments/manage-vendors)
* Track off-site vehicles: [Send a car to an outside vendor](/docs/parking-spots/send-a-car-to-an-outside-vendor)
This documentation is built and hosted on [Mintlify](https://mintlify.com), a developer documentation platform.
***Assigned to me** is a quick personal filter. It does not include vendor-only events—those stay on the full team calendar.*
## How assignments look on the calendar
**One staff member** — the event may show their name on the block or card.
**One vendor** — look for the building icon or company name in the assignee summary.
**Several people** — the summary may shorten to two names plus a count (for example **Alex +1**).
**Unassigned** — the event is still on the calendar, but no one is responsible yet. Managers often filter these during morning planning.
## Assign vendors for transport and off-site work
Transport runs and outside detail visits are common reasons to pick a **vendor** instead of (or in addition to) a staff member.
* Choose an event type such as **Vehicle Transport** or **Dealer Service** when the work happens off-site.
* Assign the transport or detail **vendor** in **Assigned to** so dispatch knows who is responsible.
* When the **vehicle** physically leaves your building, also update parking on the car record—see [Send a car to an outside vendor](/docs/parking-spots/send-a-car-to-an-outside-vendor).
## Common mistakes to avoid
**Do not confuse vendor assignment with moving a car off-site**
Assigning a **vendor** on an event tells your team who owns the *scheduled work*. To record that the *vehicle* is at a vendor location on your parking map, use [Move a car](/docs/cars/move-a-car) on the car record.
**Check permissions if the field is grayed out**
Some roles cannot change assignments. Ask an admin to update the event or review permissions in [Settings > Team](https://www.carstoragesoftware.com/dashboard/settings/team).
**Vendor not in the list?**
Add the company under [Contacts > Vendors](https://www.carstoragesoftware.com/dashboard/contacts/vendors) first. The **Assigned to** picker only shows active vendor records your facility has already created.
## Troubleshooting
**I do not see the Vendors section**
Your facility may not have any active vendors yet. Open [Contacts > Vendors](https://www.carstoragesoftware.com/dashboard/contacts/vendors), add the partner, then return to Schedule.
**Assigned to me shows nothing**
The filter only shows events assigned to **your** user account—not vendors. Vendor-only events stay visible on the full team calendar.
**All-day work still needs an owner**
Turning on **All day** only hides the clock time. It does not assign the job. Set **Assigned to** so the next person can find the visit with **Assigned to me**. See [Create an all-day event](/docs/schedule/create-an-all-day-event).
## What to do next
* Create the event: [Create an appointment](/docs/schedule/create-an-appointment)
* Schedule work with no clock time: [Create an all-day event](/docs/schedule/create-an-all-day-event)
* Change time or notes later: [Update, assign, or reschedule an event](/docs/schedule/update-assign-or-reschedule-an-event)
* Add vendor records: [Manage vendors](/docs/payments/manage-vendors)
* Track off-site vehicles: [Send a car to an outside vendor](/docs/parking-spots/send-a-car-to-an-outside-vendor)
This documentation is built and hosted on [Mintlify](https://mintlify.com), a developer documentation platform.