> ## Documentation Index
> Fetch the complete documentation index at: https://www.carstoragesoftware.com/docs/llms.txt
> Use this file to discover all available pages before exploring further.
# Use Table view on Schedule
> Scan, sort, and review many scheduled events in a list when the calendar feels too crowded.
## What you will accomplish
You will open **Table** view on [Schedule](https://www.carstoragesoftware.com/dashboard/schedule) and use it like a sortable list of every visit on your calendar. This helps when you need to scan a busy week, sort by status, or open several events in a row without hunting for colored blocks on the time grid.
When you finish this guide, you will know how to:
* Switch from Calendar to **Table** view in **Filters & Settings**.
* Sort events by date, status, customer, or vehicle.
* Open full event details from the **Details** button on any row.
* Show or hide columns your team actually needs.
* Move through long lists using page controls at the bottom.
## When Table view helps most
* Monday morning when many events arrived over the weekend and you need a quick scan.
* You want to sort by **Status** to see everything still **Incomplete** or waiting on **Pending Approval**.
* The calendar groups overlapping visits into one block and you need each event on its own row.
* Front desk is clearing overnight **Needs Approval** requests and wants a sortable list instead of clicking calendar blocks.
**Table is not the Progress board**
**Table** shows events as rows with columns (date, customer, status, and more). **Progress** groups work by stage (**To Do**, **In Progress**, **Done**). Use [Track work in the Progress view](/docs/schedule/track-work-in-progress-view) when you care about whether work is finished—not just when it is scheduled.
## Before you start
* Open [Schedule](https://www.carstoragesoftware.com/dashboard/schedule) from the dashboard sidebar.
* Make sure events already exist on the calendar. If the list is empty, create one with [Create an appointment](/docs/schedule/create-an-appointment).
* Know what you are looking for: a date range, a customer name, or a status such as **Pending Approval**.
## Open Table view
On [Schedule](https://www.carstoragesoftware.com/dashboard/schedule), click **Filters & Settings** near the top-right.
**Expected result:** A panel opens on the right with **VIEW MODE** at the top.
Under **VIEW MODE**, click **Table**.
**Expected result:** The page title area shows **TABLE** next to **Schedule**. The time grid disappears and rows of events appear instead.
Each row shows one scheduled visit. You should see columns such as **Date & Time**, **Event Type**, **Status**, **Vehicle**, **Customer**, and **Description**.
**Why this matters:** One row equals one event. Nothing is hidden inside a grouped calendar block.
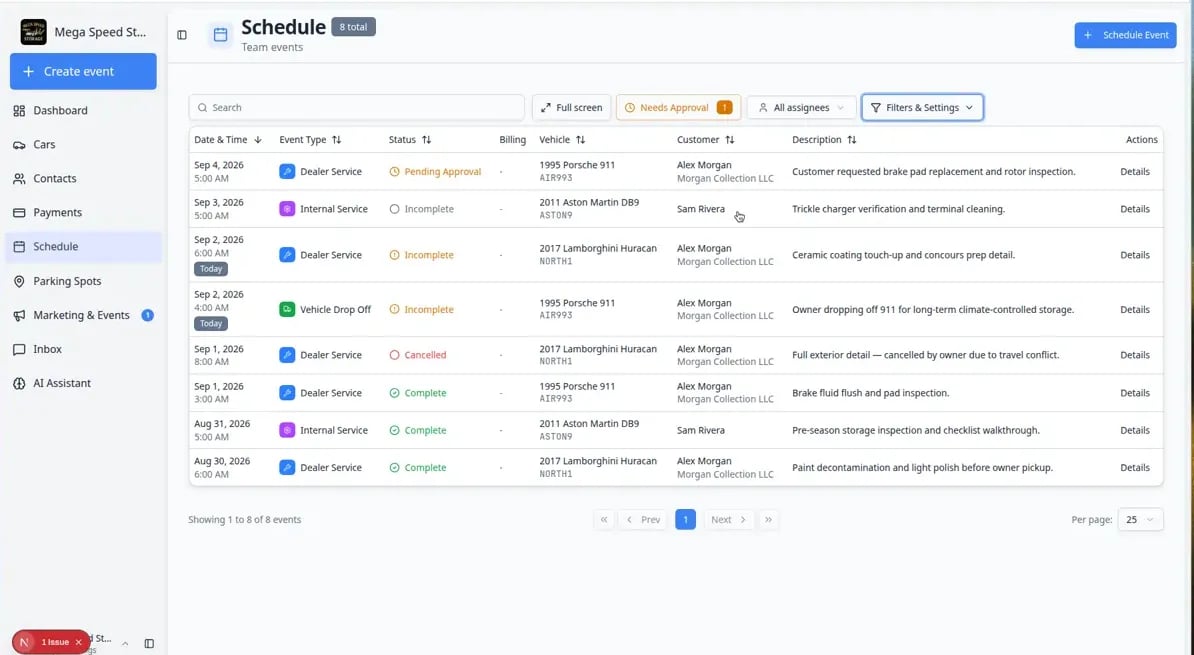 *Table view lists every event on its own row. Color badges help you spot **Dealer Service**, **Internal Service**, and **Vehicle Transport** visits at a glance.*
## Read the columns
**Date & Time** — when the visit starts (and often how long it runs).
**Event Type** — the kind of work, such as **Dealer Service** or **Internal Service**. Each type has a color badge.
**Status** — where the visit stands. You may also see workflow progress (for example **3 of 5 steps**) or a custom status badge when your event type uses one.
**Vehicle** — year, make, and model when the event is tied to a car.
**Customer** — who the visit is for.
**Description** — notes your team added when the event was created.
**Billing** (optional) — invoice or quote status when your team links billing to visits. Turn this column on in **Filters & Settings** when front desk needs to see who still owes money.
**Actions** — the **Details** button to open the full event panel.
## Sort and group rows
Click **Date & Time**, **Status**, **Customer**, or another column header.
**Expected result:** Rows reorder. Click again to reverse the sort direction.
**Why this matters:** Sorting by **Status** groups incomplete work together—helpful on Monday mornings.
Sort by **Status** to see **Pending Approval**, **Scheduled**, or **Incomplete** events at the top or bottom of the list.
**Expected result:** You can clear overnight booking requests or follow up on visits that never moved to **Complete**.
*Table view lists every event on its own row. Color badges help you spot **Dealer Service**, **Internal Service**, and **Vehicle Transport** visits at a glance.*
## Read the columns
**Date & Time** — when the visit starts (and often how long it runs).
**Event Type** — the kind of work, such as **Dealer Service** or **Internal Service**. Each type has a color badge.
**Status** — where the visit stands. You may also see workflow progress (for example **3 of 5 steps**) or a custom status badge when your event type uses one.
**Vehicle** — year, make, and model when the event is tied to a car.
**Customer** — who the visit is for.
**Description** — notes your team added when the event was created.
**Billing** (optional) — invoice or quote status when your team links billing to visits. Turn this column on in **Filters & Settings** when front desk needs to see who still owes money.
**Actions** — the **Details** button to open the full event panel.
## Sort and group rows
Click **Date & Time**, **Status**, **Customer**, or another column header.
**Expected result:** Rows reorder. Click again to reverse the sort direction.
**Why this matters:** Sorting by **Status** groups incomplete work together—helpful on Monday mornings.
Sort by **Status** to see **Pending Approval**, **Scheduled**, or **Incomplete** events at the top or bottom of the list.
**Expected result:** You can clear overnight booking requests or follow up on visits that never moved to **Complete**.
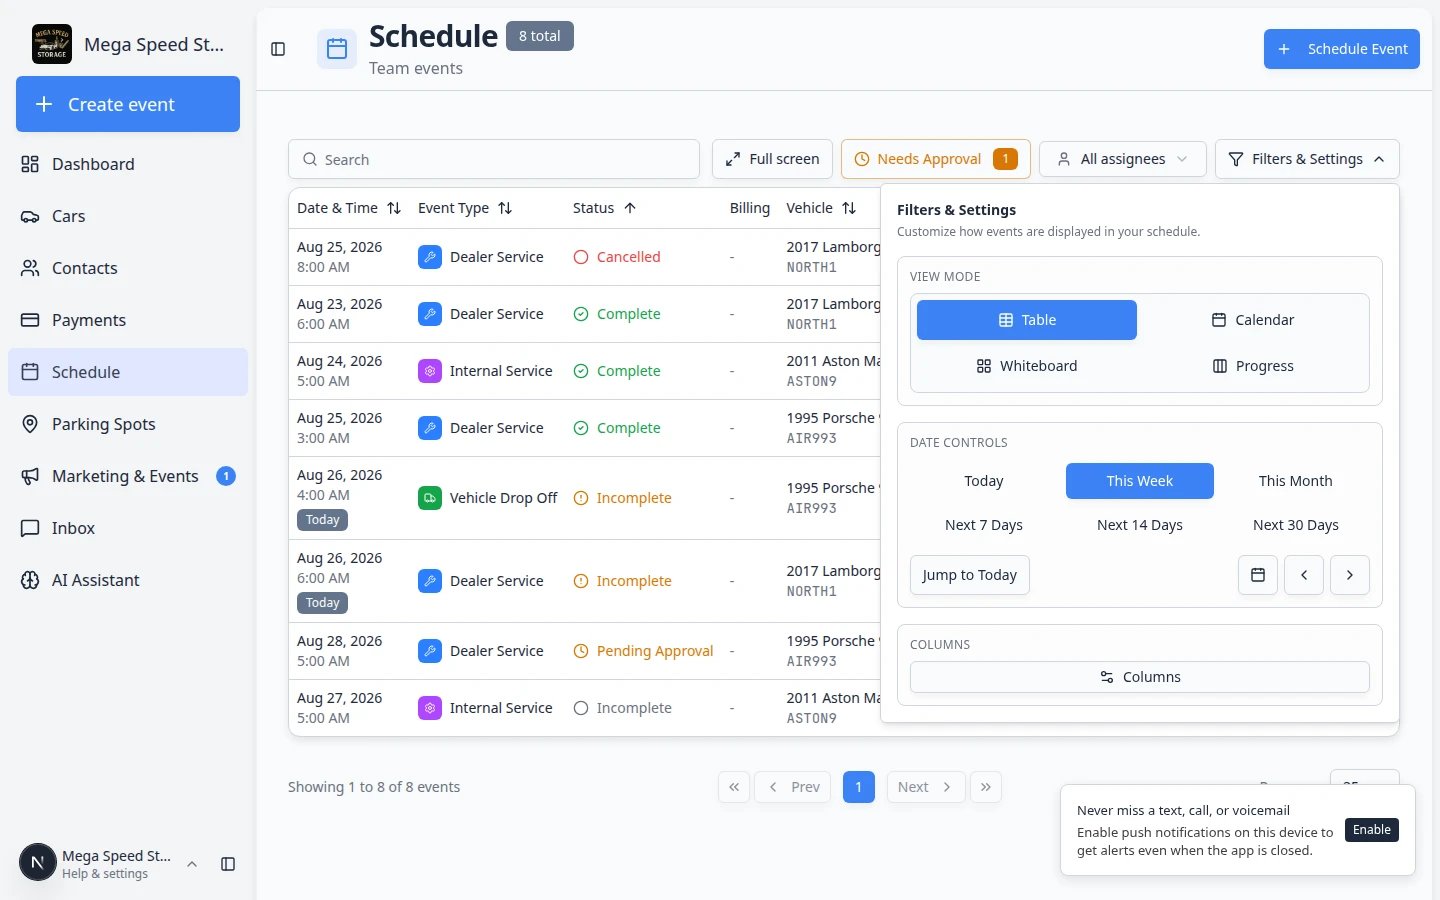 *Click the **Status** column header to sort rows. Many teams sort by status on Monday mornings to clear **Pending Approval** and **Incomplete** work first.*
**Pair Table with Needs Approval**
Click **Needs Approval** before you switch to **Table** view when you only want to review online booking requests. See [Approve or decline a customer booking request](/docs/schedule/approve-or-decline-customer-booking-requests).
**Billing column vs calendar dots**
On **Calendar** view, small colored dots on event blocks can also show invoice status. Table view is easier when you want to **sort** by billing state. See [Find and filter scheduled work](/docs/schedule/find-and-filter-scheduled-work) for what the dots mean.
## Open event details from a row
Scroll the list or use the **Search** box at the top to narrow rows by customer, vehicle, or notes.
**Expected result:** Only matching rows stay visible.
On the right side of the row, click **Details**.
**Expected result:** The event panel opens on the right (or as a full sheet on a phone). You see the same information as when you click an event on the calendar—time, customer, vehicle, notes, **Edit Event**, and **Open Event** when the visit uses a workflow.
*Click the **Status** column header to sort rows. Many teams sort by status on Monday mornings to clear **Pending Approval** and **Incomplete** work first.*
**Pair Table with Needs Approval**
Click **Needs Approval** before you switch to **Table** view when you only want to review online booking requests. See [Approve or decline a customer booking request](/docs/schedule/approve-or-decline-customer-booking-requests).
**Billing column vs calendar dots**
On **Calendar** view, small colored dots on event blocks can also show invoice status. Table view is easier when you want to **sort** by billing state. See [Find and filter scheduled work](/docs/schedule/find-and-filter-scheduled-work) for what the dots mean.
## Open event details from a row
Scroll the list or use the **Search** box at the top to narrow rows by customer, vehicle, or notes.
**Expected result:** Only matching rows stay visible.
On the right side of the row, click **Details**.
**Expected result:** The event panel opens on the right (or as a full sheet on a phone). You see the same information as when you click an event on the calendar—time, customer, vehicle, notes, **Edit Event**, and **Open Event** when the visit uses a workflow.
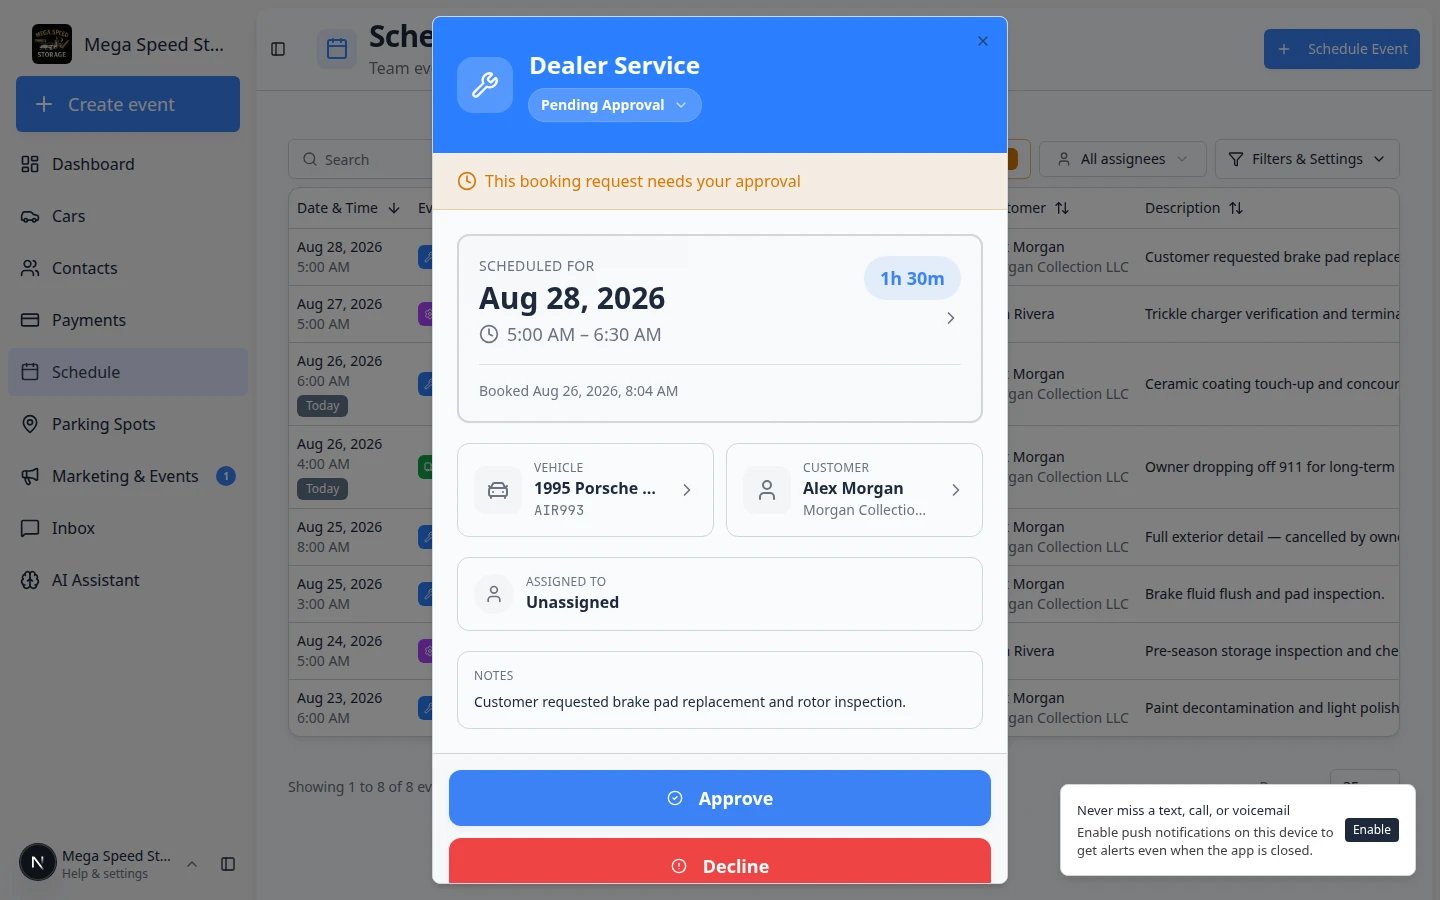 *Click **Details** on any row to open the full event panel. From here you can **Edit Event**, change status, or click **Open Event** to run the floor workflow.*
## Show or hide columns
Some teams want extra columns visible (such as billing). Others hide columns on a small laptop screen.
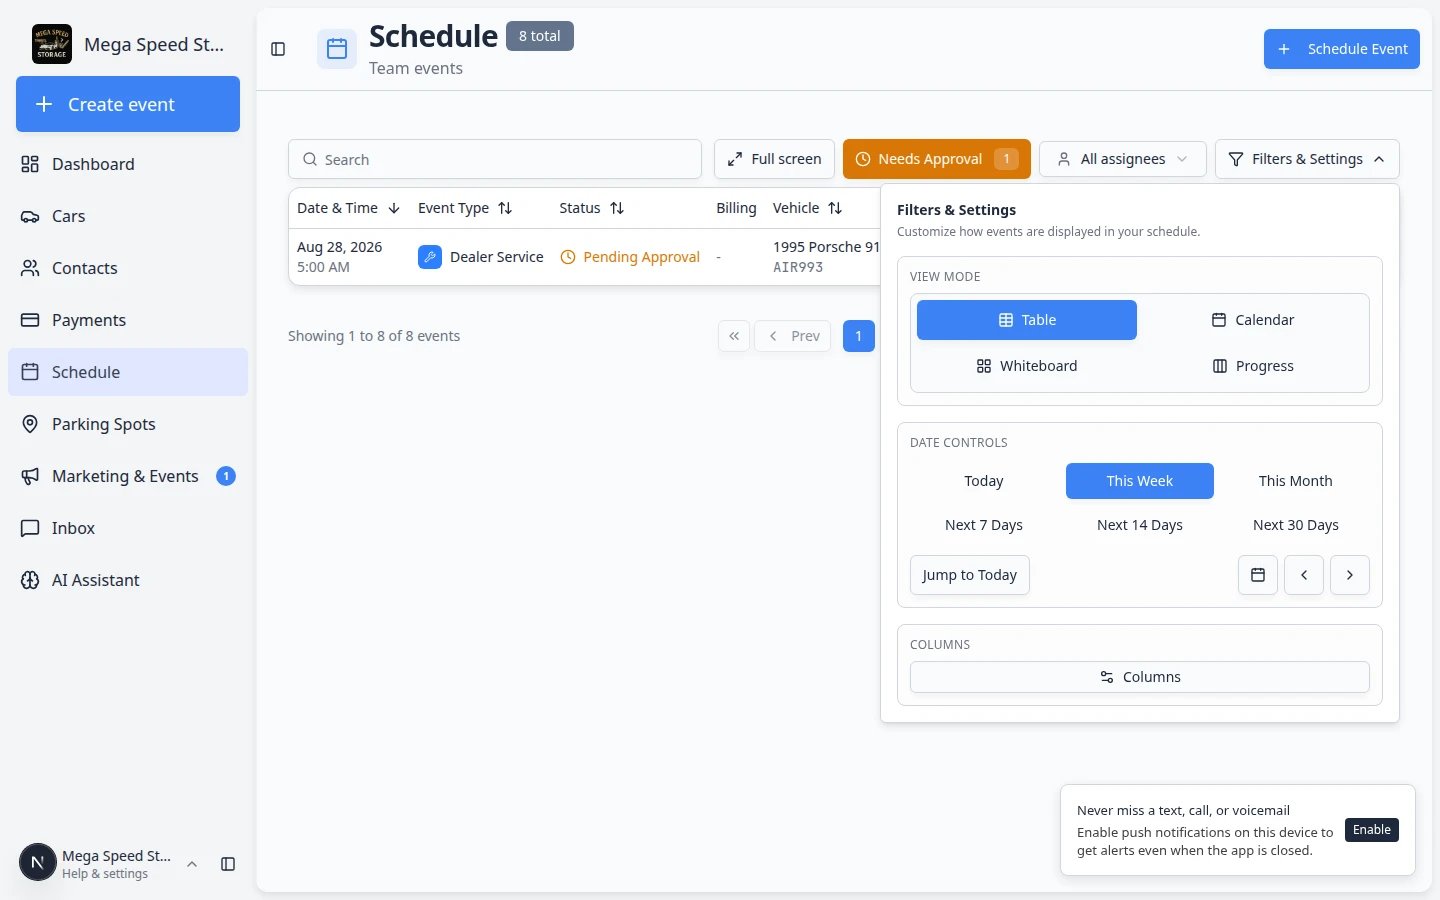
Click **Filters & Settings** again. Look for a **COLUMNS** section in the panel.
Turn columns on or off to match how your team works. Drag column names up or down to change the order they appear in the table.
**Expected result:** The table refreshes with only the columns you selected, in the order you chose. Your choices are saved for your user account the next time you open Schedule.
*Click **Details** on any row to open the full event panel. From here you can **Edit Event**, change status, or click **Open Event** to run the floor workflow.*
## Show or hide columns
Some teams want extra columns visible (such as billing). Others hide columns on a small laptop screen.
Click **Filters & Settings** again. Look for a **COLUMNS** section in the panel.
Turn columns on or off to match how your team works. Drag column names up or down to change the order they appear in the table.
**Expected result:** The table refreshes with only the columns you selected, in the order you chose. Your choices are saved for your user account the next time you open Schedule.
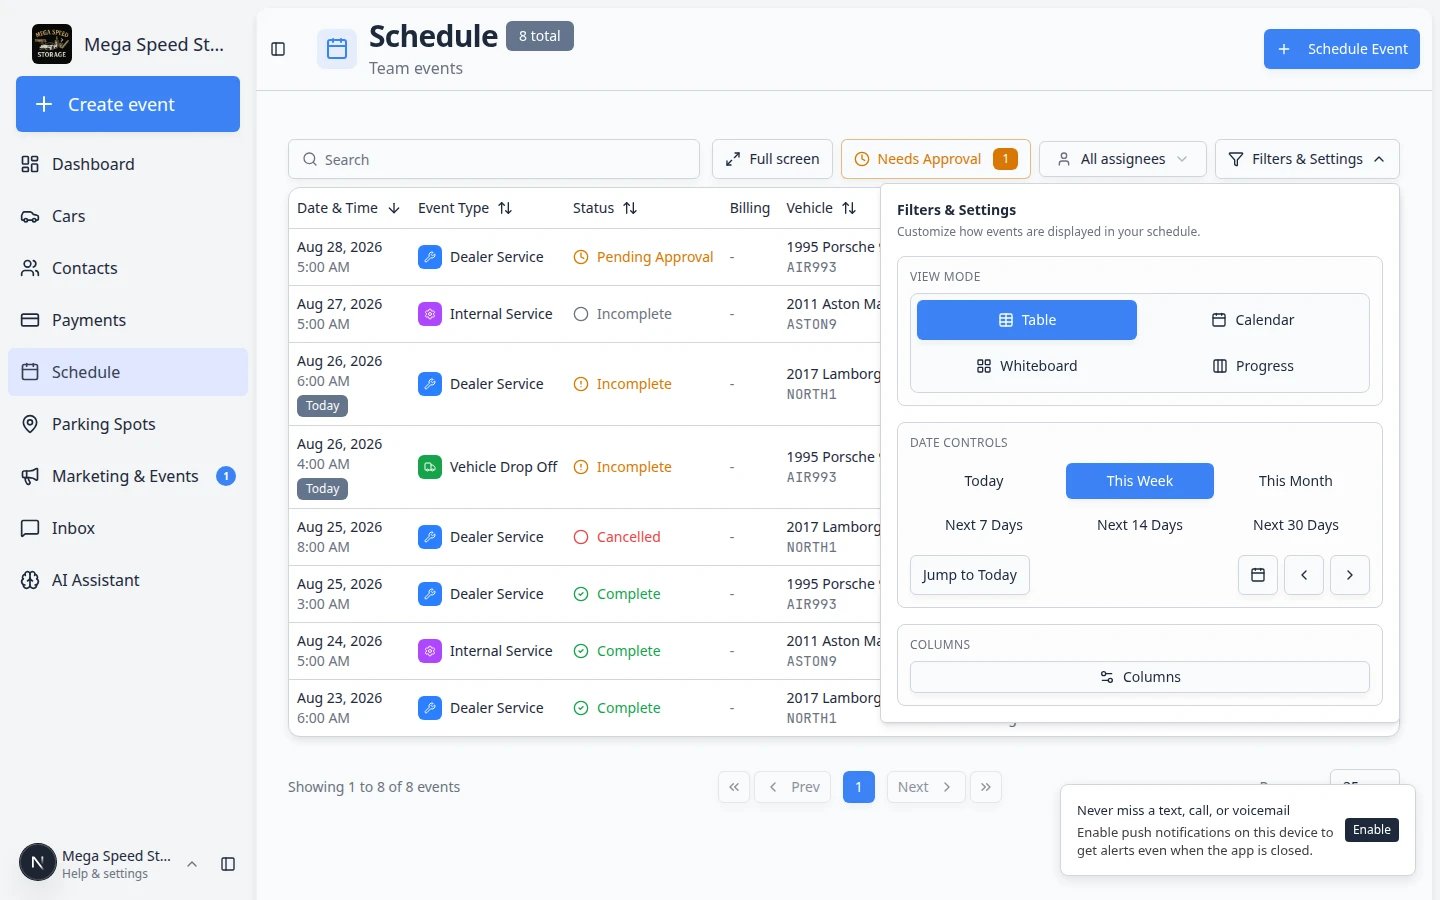 *In Table view, open **Filters & Settings** to switch views and choose which columns appear in the list.*
## Move through long lists
When your facility has many events, the table may span more than one page.
Look for text such as **Showing 1 to 25 of 48 events** and arrow buttons to move between pages.
Some screens let you pick how many rows show at once (for example **25**, **50**, or **100**).
**Why this matters:** A higher number means fewer page clicks when you are auditing a full week.
## Pair Table view with quick filters
Table view works with the same top-bar filters as every other Schedule view.
* **Search** — type a customer name, vehicle, plate, or note to hide rows that do not match.
* **Needs Approval** — show only online booking requests waiting for your team. See [Approve or decline a customer booking request](/docs/schedule/approve-or-decline-customer-booking-requests).
* **Assigned to me** — show only events assigned to your user account.
**Clearing overnight booking requests**
Click **Needs Approval**, switch to **Table**, sort by **Date & Time**, then open **Details** on each **Pending Approval** row. Table plus **Needs Approval** is often the fastest Monday-morning workflow.
*In Table view, open **Filters & Settings** to switch views and choose which columns appear in the list.*
## Move through long lists
When your facility has many events, the table may span more than one page.
Look for text such as **Showing 1 to 25 of 48 events** and arrow buttons to move between pages.
Some screens let you pick how many rows show at once (for example **25**, **50**, or **100**).
**Why this matters:** A higher number means fewer page clicks when you are auditing a full week.
## Pair Table view with quick filters
Table view works with the same top-bar filters as every other Schedule view.
* **Search** — type a customer name, vehicle, plate, or note to hide rows that do not match.
* **Needs Approval** — show only online booking requests waiting for your team. See [Approve or decline a customer booking request](/docs/schedule/approve-or-decline-customer-booking-requests).
* **Assigned to me** — show only events assigned to your user account.
**Clearing overnight booking requests**
Click **Needs Approval**, switch to **Table**, sort by **Date & Time**, then open **Details** on each **Pending Approval** row. Table plus **Needs Approval** is often the fastest Monday-morning workflow.
 ***Needs Approval** plus **Table** view is a fast Monday-morning workflow: one sortable list of every portal request waiting for your team.*
## Common mistakes to avoid
**Looking for time gaps in Table view**
Table view does not show open time slots on a clock grid. Use **Calendar** view when you need to answer “Is 2:00 PM free?” Switch back with **Filters & Settings** → **Calendar**.
**Thinking a missing row means the event was deleted**
Clear the **Search** box, turn off **Assigned to me**, and check that you are not filtering to **Needs Approval** only. The event may still be on the calendar in another view.
## Troubleshooting
**The table looks empty**
Create a test event with [Create an appointment](/docs/schedule/create-an-appointment), or widen your filters. An empty search field and **Needs Approval** turned off should show all events in range.
**I cannot find Open Event on a row**
**Open Event** appears in the **Details** panel, not on the row itself. Click **Details**, then look for the blue **Open Event** button. Some event types (such as **Calendar Block**) do not use workflows. See [Run event workflow from Schedule](/docs/schedule/run-event-workflow-from-schedule).
## What to do next
* Clear online requests with [Approve or decline a customer booking request](/docs/schedule/approve-or-decline-customer-booking-requests).
* Run floor work with [Run event workflow from Schedule](/docs/schedule/run-event-workflow-from-schedule).
* Compare all four views in [Find and filter scheduled work](/docs/schedule/find-and-filter-scheduled-work).
* Return to [Schedule overview](/docs/schedule/overview).
This documentation is built and hosted on [Mintlify](https://mintlify.com), a developer documentation platform.
***Needs Approval** plus **Table** view is a fast Monday-morning workflow: one sortable list of every portal request waiting for your team.*
## Common mistakes to avoid
**Looking for time gaps in Table view**
Table view does not show open time slots on a clock grid. Use **Calendar** view when you need to answer “Is 2:00 PM free?” Switch back with **Filters & Settings** → **Calendar**.
**Thinking a missing row means the event was deleted**
Clear the **Search** box, turn off **Assigned to me**, and check that you are not filtering to **Needs Approval** only. The event may still be on the calendar in another view.
## Troubleshooting
**The table looks empty**
Create a test event with [Create an appointment](/docs/schedule/create-an-appointment), or widen your filters. An empty search field and **Needs Approval** turned off should show all events in range.
**I cannot find Open Event on a row**
**Open Event** appears in the **Details** panel, not on the row itself. Click **Details**, then look for the blue **Open Event** button. Some event types (such as **Calendar Block**) do not use workflows. See [Run event workflow from Schedule](/docs/schedule/run-event-workflow-from-schedule).
## What to do next
* Clear online requests with [Approve or decline a customer booking request](/docs/schedule/approve-or-decline-customer-booking-requests).
* Run floor work with [Run event workflow from Schedule](/docs/schedule/run-event-workflow-from-schedule).
* Compare all four views in [Find and filter scheduled work](/docs/schedule/find-and-filter-scheduled-work).
* Return to [Schedule overview](/docs/schedule/overview).
This documentation is built and hosted on [Mintlify](https://mintlify.com), a developer documentation platform.