> ## Documentation Index
> Fetch the complete documentation index at: https://www.carstoragesoftware.com/docs/llms.txt
> Use this file to discover all available pages before exploring further.
# Use the 2-week view and day detail panel
> Plan two weeks at a glance on Schedule, hide weekends when you want, and keep a day list open beside the calendar.
## What you will accomplish
You will use three calendar controls on [Schedule](https://www.carstoragesoftware.com/dashboard/schedule) that help managers plan ahead without losing detail:
* **2 Week** view — see fourteen days on one screen.
* **Show weekends** — hide Saturday and Sunday when your shop is closed.
* **Day detail panel** — keep a side list of one day’s events while you browse the month or two-week grid.
**Expected outcome:** You can spot busy weeks, open a single day’s full list, and add work without guessing which dates are already full.
## When to use these controls
* You plan storage check-ins or dealer transport runs more than a few days ahead.
* **5 Day** feels too narrow but **Month** hides the time-of-day detail you still need.
* Your shop is closed on weekends and empty Saturday/Sunday columns clutter the grid.
* You like clicking days on a month-style grid while keeping a readable event list on the side.
## Before you start
* Open [Schedule](https://www.carstoragesoftware.com/dashboard/schedule).
* Make sure **Calendar** is your **View Mode** (not Table, Whiteboard, or Progress).
## Open 2 Week view
Click **Filters & Settings** near the top-right of [Schedule](https://www.carstoragesoftware.com/dashboard/schedule).
**Expected result:** The settings panel opens.
Under **View Mode**, click **Calendar** if it is not already highlighted.
In the calendar range row, click **2 Week** (between **5 Day** and **Month**).
**Expected result:** The main area shows a two-week grid. Use the left and right arrows or **Today** to move forward and backward.
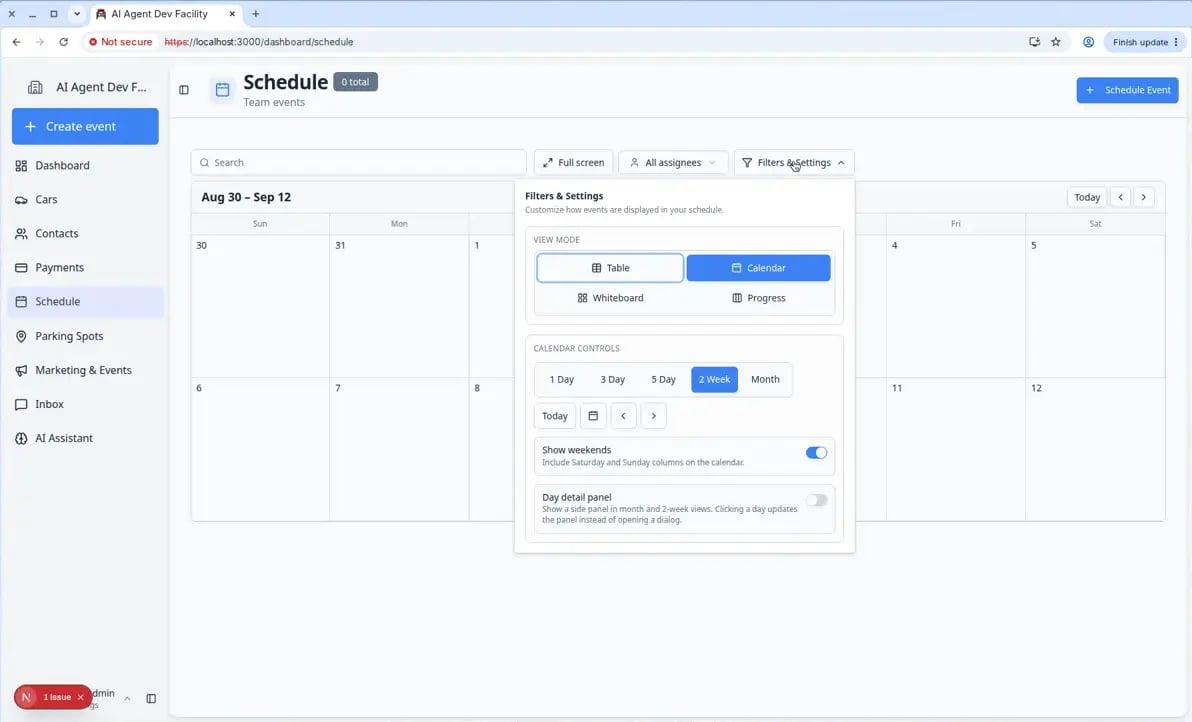 *Open **Filters & Settings** to switch to **2 Week** and turn weekend or day-panel options on or off.*
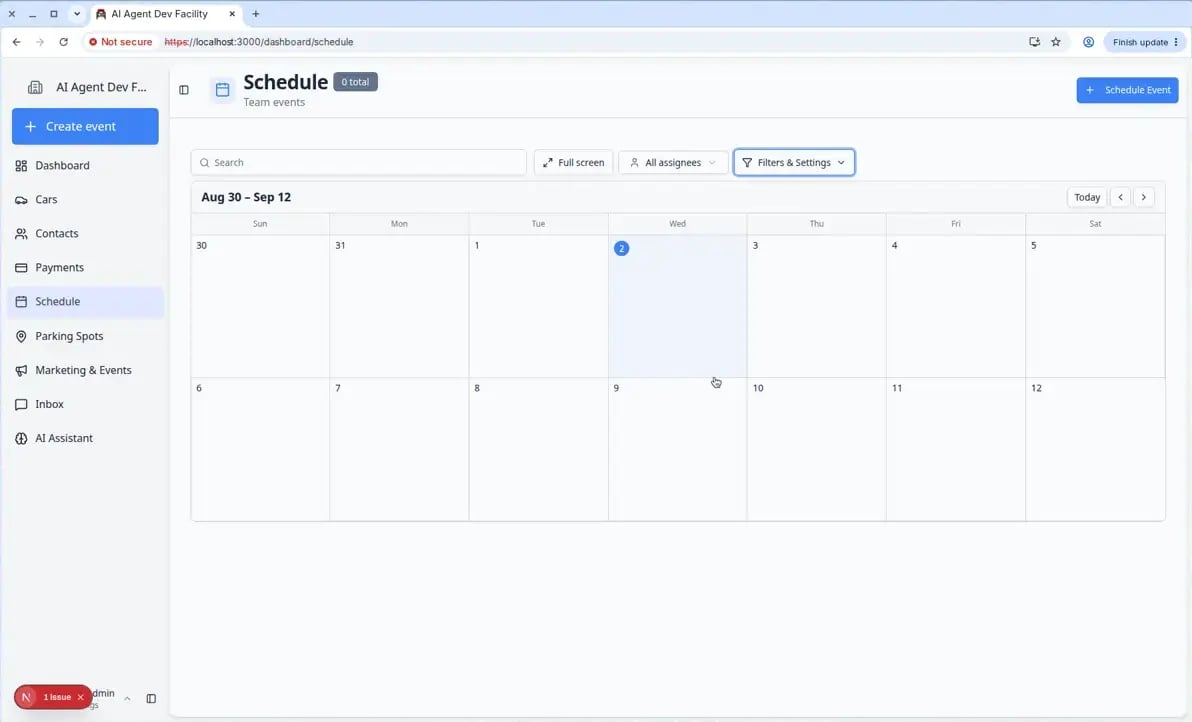 ***2 Week** view balances planning range and readability—useful for transport and service managers.*
**1 Day** and **3 Day** focus on hour-by-hour work today. **5 Day** covers the work week. **2 Week** helps you answer “What does the next pay period look like?” **Month** is best when you only need dates, not times.
On **1 Day**, **3 Day**, and **5 Day**, look at the **ALL DAY** row above the hours for visits with no clock time. See [Create an all-day event](/docs/schedule/create-an-all-day-event).
## Hide weekends (optional)
If your facility is closed Saturday and Sunday, hiding those columns gives you more room for Monday–Friday work.
Return to **Filters & Settings** while you are in **Calendar** view.
Find **Show weekends** with the helper text *Include Saturday and Sunday columns on the calendar.*
* Turn **on** when you accept weekend drop-offs or events.
* Turn **off** when Monday–Friday is enough and weekend columns waste space.
**Expected result:** Saturday and Sunday columns disappear or reappear on the grid.
Scroll across the two-week range. Busy weekdays should be easier to read without empty weekend columns.
**Why this matters:** Managers make faster staffing calls when every visible column is a day you are actually open.
***2 Week** view balances planning range and readability—useful for transport and service managers.*
**1 Day** and **3 Day** focus on hour-by-hour work today. **5 Day** covers the work week. **2 Week** helps you answer “What does the next pay period look like?” **Month** is best when you only need dates, not times.
On **1 Day**, **3 Day**, and **5 Day**, look at the **ALL DAY** row above the hours for visits with no clock time. See [Create an all-day event](/docs/schedule/create-an-all-day-event).
## Hide weekends (optional)
If your facility is closed Saturday and Sunday, hiding those columns gives you more room for Monday–Friday work.
Return to **Filters & Settings** while you are in **Calendar** view.
Find **Show weekends** with the helper text *Include Saturday and Sunday columns on the calendar.*
* Turn **on** when you accept weekend drop-offs or events.
* Turn **off** when Monday–Friday is enough and weekend columns waste space.
**Expected result:** Saturday and Sunday columns disappear or reappear on the grid.
Scroll across the two-week range. Busy weekdays should be easier to read without empty weekend columns.
**Why this matters:** Managers make faster staffing calls when every visible column is a day you are actually open.
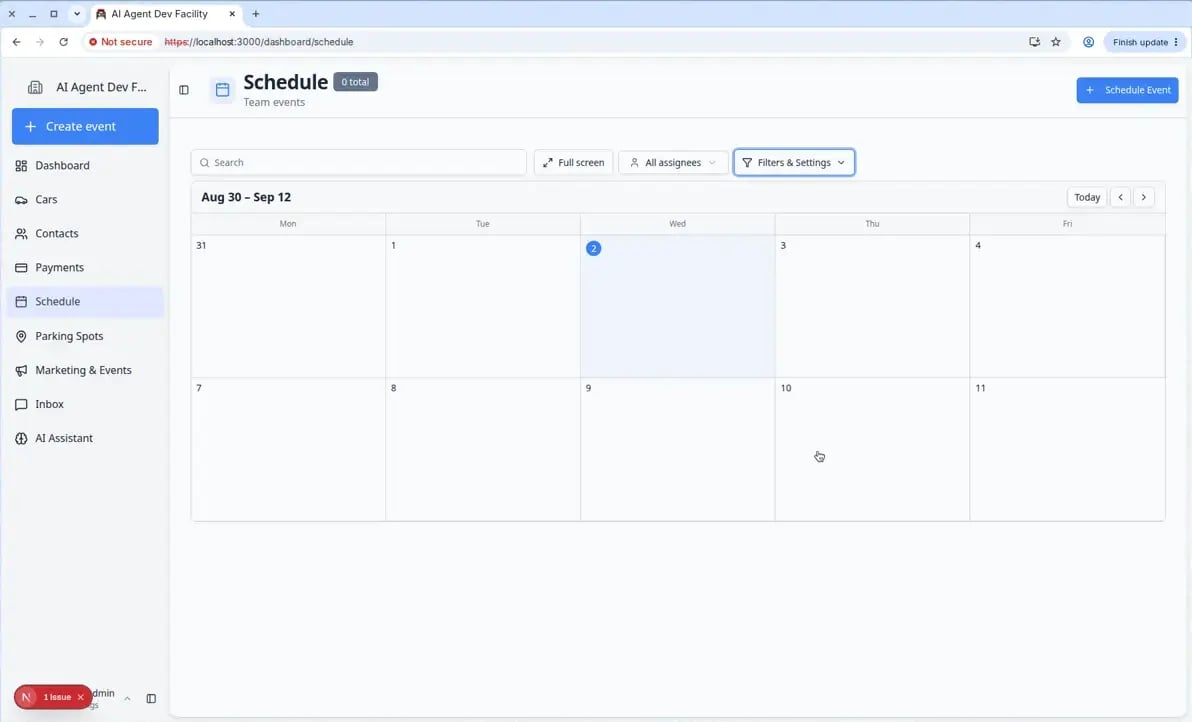 *With **Show weekends** off, the grid shows only weekdays—helpful when your shop runs Monday–Friday.*
**Weekend setting is personal**
Schedule remembers your last choice. One manager may keep weekends visible while another hides them—each person’s view can differ.
## Turn on the day detail panel
The **Day detail panel** appears only in **Month** and **2 Week** views.
In **Filters & Settings**, click **Month** or **2 Week**.
Turn on **Day detail panel**.
The helper text explains: *Show a side panel in month and 2-week views. Clicking a day updates the panel instead of opening a dialog.*
Click any date on the calendar grid.
**Expected result:** A side panel lists every event that day—times, vehicles, and event types—without covering the whole month.
Click an event in the panel to open its details, or use **Create Event on This Day** when the day is still empty.
See [Create an appointment](/docs/schedule/create-an-appointment) for the full create steps.
*With **Show weekends** off, the grid shows only weekdays—helpful when your shop runs Monday–Friday.*
**Weekend setting is personal**
Schedule remembers your last choice. One manager may keep weekends visible while another hides them—each person’s view can differ.
## Turn on the day detail panel
The **Day detail panel** appears only in **Month** and **2 Week** views.
In **Filters & Settings**, click **Month** or **2 Week**.
Turn on **Day detail panel**.
The helper text explains: *Show a side panel in month and 2-week views. Clicking a day updates the panel instead of opening a dialog.*
Click any date on the calendar grid.
**Expected result:** A side panel lists every event that day—times, vehicles, and event types—without covering the whole month.
Click an event in the panel to open its details, or use **Create Event on This Day** when the day is still empty.
See [Create an appointment](/docs/schedule/create-an-appointment) for the full create steps.
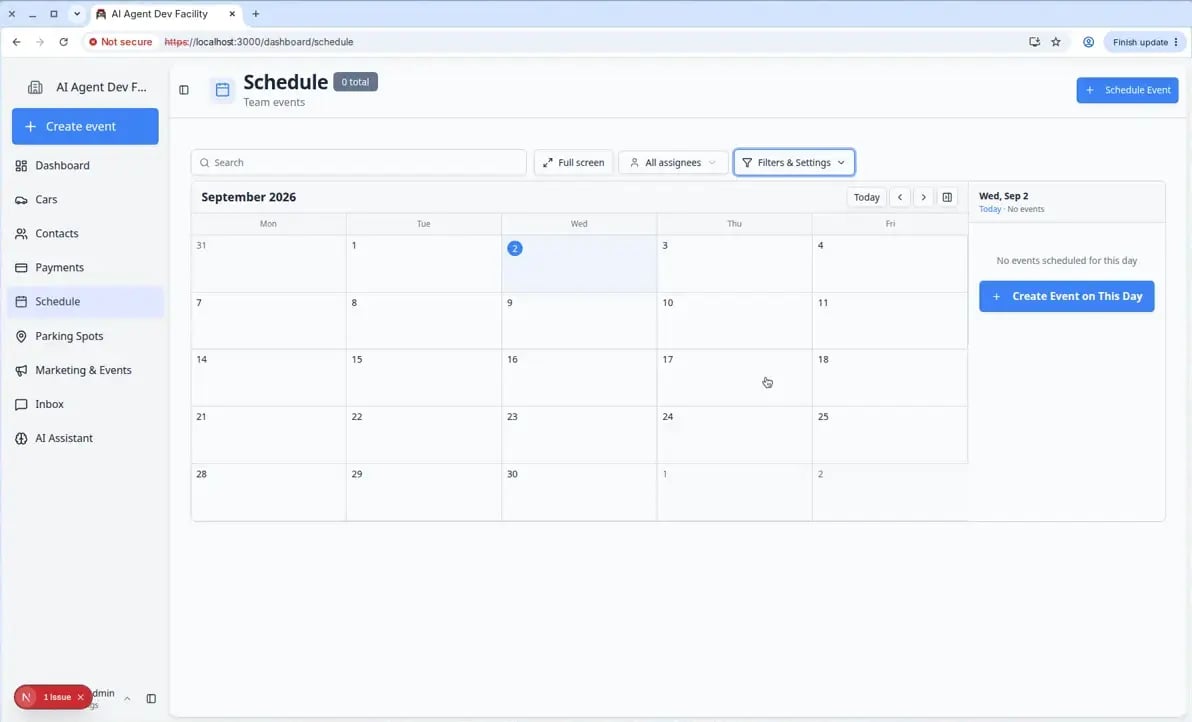 *With **Day detail panel** on, clicking a date keeps the month grid visible while the event list stays open on the side.*
## Create work from Month or 2 Week view
**Empty day** — you may see **Create Event on This Day**. The form opens with that date already selected.
**Busy day** — open the day list first, review what is booked, then click **Schedule Event** at the top of the page and pick the date manually. The app may not offer **Create Event on This Day** when events already exist.
In **Month** or **2 Week** view, click the day on the grid (with **Day detail panel** on or off).
Read the side panel or popup list before you promise a new time to a customer.
**Expected result:** You see existing drop-offs, service visits, and holds for that date.
Use **Create Event on This Day** or **Schedule Event**, then complete [Create an appointment](/docs/schedule/create-an-appointment).
**Why this matters:** Planning views are for *seeing* capacity first—then booking work into open slots.
## What success looks like
* You can move two weeks forward or backward without switching views.
* Weekend columns match how your facility actually operates.
* Clicking a day shows a readable list in the side panel (on desktop-sized screens).
* Managers can spot overloaded days before customers are promised new slots.
## Troubleshooting
**I do not see Day detail panel**
The switch only appears in **Month** and **2 Week** views. Switch away from **1 Day**, **3 Day**, or **5 Day** first.
**Clicking a day opens a popup instead of a panel**
Turn **Day detail panel** on in **Filters & Settings**, or widen your browser window. On very small screens the app may still use a dialog so the calendar stays readable.
**I do not see 2 Week in the list**
Confirm **View Mode** is set to **Calendar** inside **Filters & Settings**. **2 Week** does not appear in Table, Whiteboard, or Progress views.
## What to do next
* Search and filter across views: [Find and filter scheduled work](/docs/schedule/find-and-filter-scheduled-work)
* Create your first event: [Create an appointment](/docs/schedule/create-an-appointment)
* Read colors and icons on blocks: [Read calendar icons and badges](/docs/schedule/read-calendar-icons-and-badges)
This documentation is built and hosted on [Mintlify](https://mintlify.com), a developer documentation platform.
*With **Day detail panel** on, clicking a date keeps the month grid visible while the event list stays open on the side.*
## Create work from Month or 2 Week view
**Empty day** — you may see **Create Event on This Day**. The form opens with that date already selected.
**Busy day** — open the day list first, review what is booked, then click **Schedule Event** at the top of the page and pick the date manually. The app may not offer **Create Event on This Day** when events already exist.
In **Month** or **2 Week** view, click the day on the grid (with **Day detail panel** on or off).
Read the side panel or popup list before you promise a new time to a customer.
**Expected result:** You see existing drop-offs, service visits, and holds for that date.
Use **Create Event on This Day** or **Schedule Event**, then complete [Create an appointment](/docs/schedule/create-an-appointment).
**Why this matters:** Planning views are for *seeing* capacity first—then booking work into open slots.
## What success looks like
* You can move two weeks forward or backward without switching views.
* Weekend columns match how your facility actually operates.
* Clicking a day shows a readable list in the side panel (on desktop-sized screens).
* Managers can spot overloaded days before customers are promised new slots.
## Troubleshooting
**I do not see Day detail panel**
The switch only appears in **Month** and **2 Week** views. Switch away from **1 Day**, **3 Day**, or **5 Day** first.
**Clicking a day opens a popup instead of a panel**
Turn **Day detail panel** on in **Filters & Settings**, or widen your browser window. On very small screens the app may still use a dialog so the calendar stays readable.
**I do not see 2 Week in the list**
Confirm **View Mode** is set to **Calendar** inside **Filters & Settings**. **2 Week** does not appear in Table, Whiteboard, or Progress views.
## What to do next
* Search and filter across views: [Find and filter scheduled work](/docs/schedule/find-and-filter-scheduled-work)
* Create your first event: [Create an appointment](/docs/schedule/create-an-appointment)
* Read colors and icons on blocks: [Read calendar icons and badges](/docs/schedule/read-calendar-icons-and-badges)
This documentation is built and hosted on [Mintlify](https://mintlify.com), a developer documentation platform.